
🪑 Seat-Based Order
Seat-based ordering lets your servers track who at the table ordered what. Instead of one big ticket per table, each guest’s items are tagged to their specific seat — making split-bills and personalized service effortless.
Each guest at the table has their own order — tracked by seat number
Without seat-based ordering: “Who got the steak?” 🤷♂️
With seat-based ordering: “Steak goes to Seat 1.2” — server, kitchen, and bill all know.
🎯 Why Use Seat-Based Orders?
| Problem | How Seat-Based Solves It |
|---|---|
| 🤔 “Who ordered the steak?” | Server knows it’s Seat 1.2 |
| 💸 Splitting the bill 4 ways | One click — splits exactly by what each seat ordered |
| 🥗 Vegan guest at a meat-eater table | Mods stay tied to the right seat |
| 👥 Server change at shift handoff | New server sees who has what |
| 🎂 Birthday person on Seat 3 | Free dessert tagged to specific guest |
| 🍷 Wine pairing per dish | Track which wine goes to which guest |
👀 Visual Example: A Table with 4 Seats
Here’s how a 4-seat table looks in ORO POS — each seat tagged S1.1, S1.2, S1.3, S1.4 (table#.seat#):
|
👨🦱
S1.1 Mike
🍔 Burger 🍟 Fries |
👩
S1.2 Sarah
🥗 Salad 🍷 Wine |
|
🍽️ Table 1
|
|
|
👨🦰
S1.3 Tom
🥩 Steak 🍺 Beer |
👩🦳
S1.4 Linda
🍝 Pasta 🍵 Tea |
Seat naming: S{table#}.{seat#} — e.g., Seat S1.2 = Table 1, Seat 2
Each seat gets a unique label: S{table}.{seat}
- S1.1 = Table 1, Seat 1
- S1.2 = Table 1, Seat 2
- S5.4 = Table 5, Seat 4
This way, even when servers handle multiple tables in a “group”, they never lose track of which seat is which.
⚙️ Prerequisites
Seat-based ordering requires the Floorplan plugin. Without it, seats can’t be configured.
Setup happens in 4 steps:
| Step | What to Do |
|---|---|
| 1️⃣ | Arrange seats around each table |
| 2️⃣ | Enable seat-based order in the Order Type |
| 3️⃣ | Take orders by seat |
| 4️⃣ | Split bills by seat (when needed) |
🪑 Step 1: Arrange Seats Around Tables
Path: Back-Office → FloorPlan → Tables → (Select table) → Edit
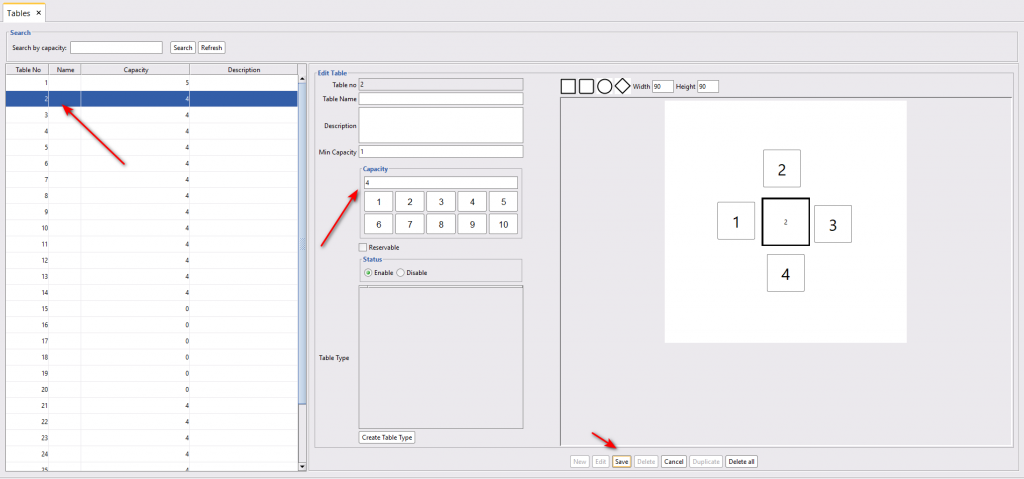
| Step | Action |
|---|---|
| 1 | Select the table you want to add seats to |
| 2 | Click Edit |
| 3 | Enter minimum capacity (must be at least 1 to save) |
| 4 | Click the desired capacity number (e.g., 4 for a 4-seater) |
| 5 | Seats appear next to the table — drag & drop to position them |
| 6 | Choose the Table Type |
| 7 | Mark Reservable if you allow advance bookings |
| 8 | Click Save |
🎫 Step 2: Enable Seat-Based Order in Order Type
Path: Back-Office → Admin → Order Type → (Select order type) → Enable Seat-Based Order
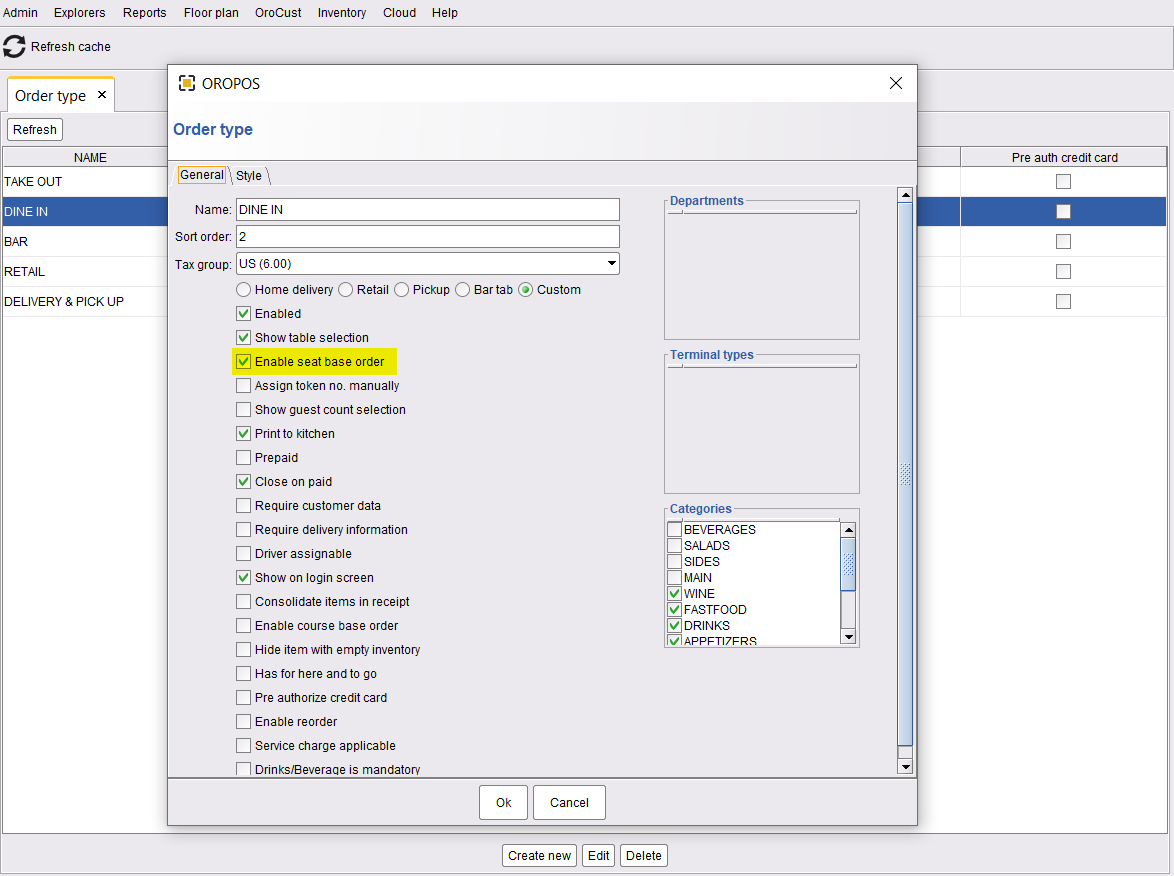
Usually only on Dine-In order types. Take Out, Delivery, and Pickup orders don’t have seats, so leave it off there.
🍽️ Step 3: Take a Seat-Based Order
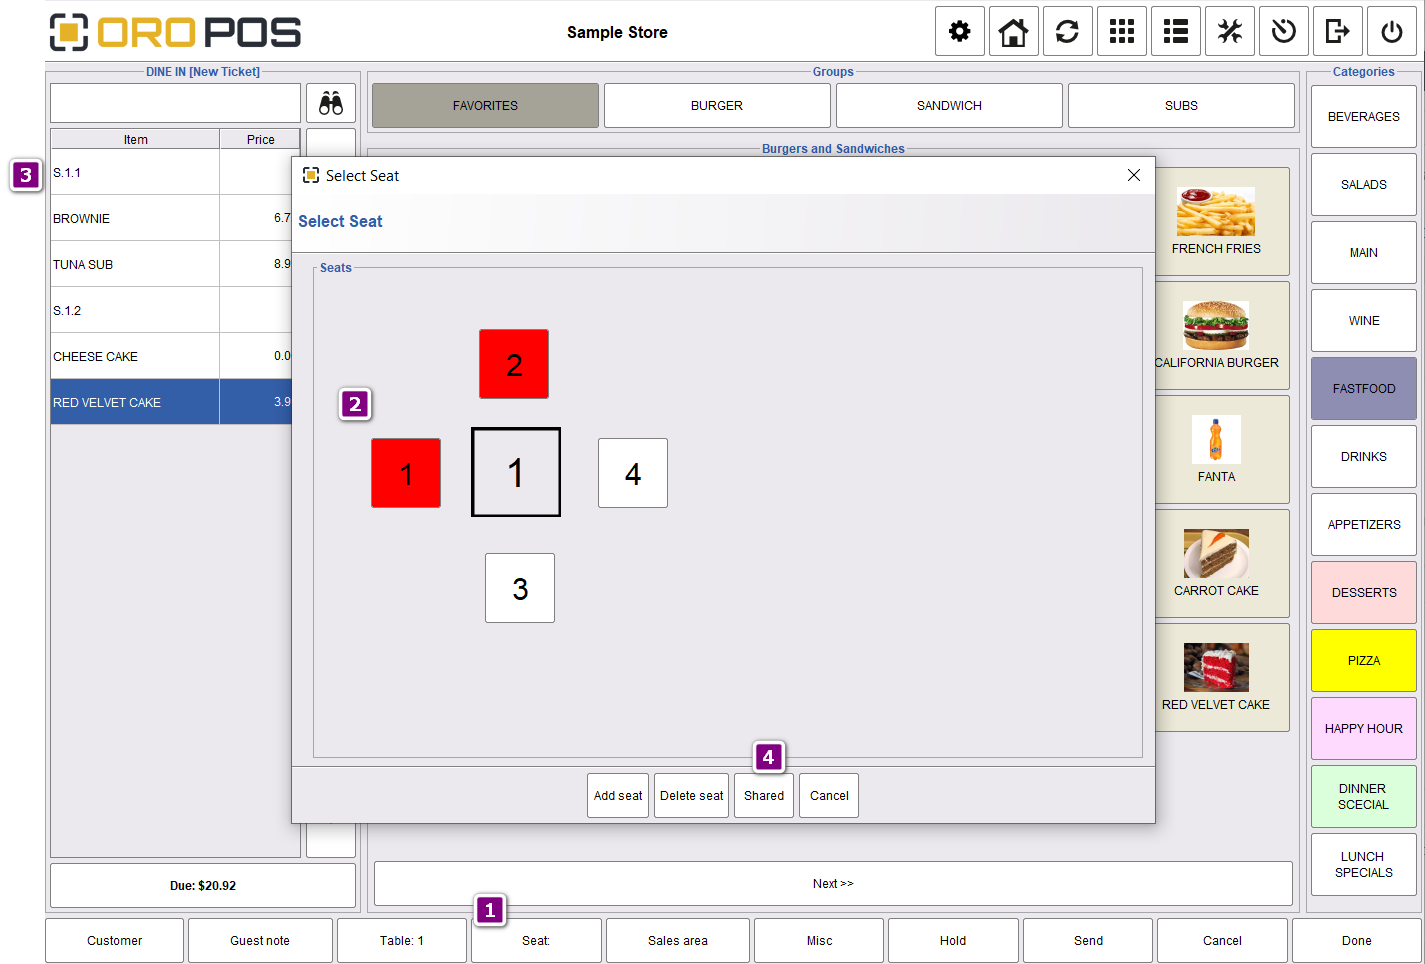
| Step | Action |
|---|---|
| 1 | Choose the table from the floor plan |
| 2 | Select the seat (e.g., S1.1) |
| 3 | Add menu items — they auto-tag to that seat |
| 4 | Select next seat (S1.2) and repeat |
| 5 | When done, send to kitchen |
📌 Real Example: Mike’s Family Dinner
Family of 4 at Table 3:
| Seat | Guest | Order |
|---|---|---|
| S3.1 | Dad | Steak ($25), Beer ($6) |
| S3.2 | Mom | Salad ($12), Wine ($9) |
| S3.3 | Kid (8 yrs) | Kids Burger ($8), Lemonade ($3) |
| S3.4 | Kid (5 yrs) | Mac & Cheese ($7), Milk ($2) |
Server sends order. Kitchen knows the steak goes to S3.1, salad to S3.2, etc. When food’s ready, server delivers it to the right person every time.
💸 Step 4: Split Bill by Seat
When the family asks “Can we split the bill?”, you don’t need to do math by hand. ORO POS already knows what each seat ordered.
📌 Continuing the Family Example
Mom & Dad want to pay separately for themselves and the kids. Server clicks Split by Seat:
| Bill | Includes | Total |
|---|---|---|
| Bill 1: Dad (S3.1) | Steak + Beer | $31 |
| Bill 2: Mom (S3.2) | Salad + Wine | $21 |
| Bill 3: Kids (S3.3 + S3.4) | Kids Burger + Lemonade + Mac & Cheese + Milk | $20 |
Three checks printed. No mental math, no errors, no awkward “I’ll figure it out” moment.
🍲 Shared Items (e.g., Soup for Two)
What if guests want to share a large bowl of soup or appetizer plate?
Use the Shared button to split the cost across multiple seats automatically.
📌 Real Example: Shared Appetizer
4 friends order a $20 nachos platter to share.
- Mark nachos as Shared
- $20 split across 4 seats = $5 per seat
- When billing splits, each seat already has $5 added
💼 Real-World Use Cases
🍴 Fine Dining
Sommelier pairs different wine with each guest’s entrée. Wine list per seat. Course timing per seat. Server never has to ask “Whose Riesling?”
👫 Date Night
Couple goes Dutch. Server splits the bill by seat with one click — no awkward “did you order the appetizer?” calculations.
🎉 Group of 10 (Office Lunch)
Office team. Everyone pays for themselves. Without seat-based: server spends 15 min figuring out 10 separate bills. With seat-based: 1 click → 10 receipts.
🎂 Birthday Treat
It’s Tom’s birthday at S1.3. Manager comps his dessert. Comp tagged to S1.3 — doesn’t reduce anyone else’s bill.
⭐ Best Practices
| Tip | Why |
|---|---|
| Train servers to always select seat first | Items default to “table” if no seat selected |
| Use Shared for appetizers/side dishes | Auto-splits costs evenly |
| Only enable on Dine-In | Take-out/delivery don’t have seats |
| Position seats visually around the table | Server matches digital seat to real seat at-a-glance |
| Use kitchen sticker printer | Each item gets a label with seat # → no delivery confusion |
📚 Related Guides
| → Floorplan Setup | → Adding Tables | → Ticket Splitting |
📞 Need More Help?
Visit guide.orocube.com or contact helpdesk@orocube.net