
📅 How to Make Table Reservations
Reservations let restaurants guarantee tables for guests and avoid both overbooking and empty tables. ORO POS Floor Plan plugin includes a complete reservation system — set tables as reservable, take bookings, and manage status from Open → Seated → Closed.

A customer calls and books Table 10 for 7 PM Friday, party of 4. Host adds the reservation in ORO POS. Friday at 7 PM, table waits for them. When they arrive → status changes to “Seated”. When they leave → “Closed”. Booking = Reservation — same thing.
🎯 Why Use Reservations?
| Without Reservations | With Reservations |
|---|---|
| 😩 Customer arrives, no table available — leaves angry | ✅ Table waiting at booked time |
| 📞 “I called yesterday” — no record | ✅ Booking history stored in system |
| 🪑 Big party shows up unannounced — chaos rearranging tables | ✅ Reserved + grouped tables ready in advance |
| 🎂 No way to mark special occasions (birthday, anniversary) | ✅ Notes attached to reservation |
| 📊 No data on no-shows, popular times | ✅ Reports help you forecast staffing |
🔄 Visual: Reservation Lifecycle
📞
BOOK
Customer calls or
walks in to reserve
📋
OPEN
Reservation in system,
table held for guest
✅
SEATED
Guest arrives,
host seats them
🍽️
DINING
Order, eat,
enjoy the meal
✓
CLOSED
Bill paid,
table released
| Status | When |
|---|---|
| 📋 Open | Booked, waiting for guest to arrive |
| ✅ Seated | Guest arrived, host seated them |
| ❌ No Appear / No Show | Guest didn’t show up — release table for walk-ins |
| 🚫 Cancelled | Customer called to cancel |
| ✓ Closed | Service complete, ticket settled |
| 🗑️ Deleted | Booked by mistake, removed from system |
1️⃣ Step 1: Configure Tables as Reservable
Don’t make every table reservable. Many stores keep 50% for walk-ins. Only mark high-value tables (window seats, private rooms, big tables) as reservable.
Path: Back-Office → FloorPlan → Floors → (Select a table) → Edit
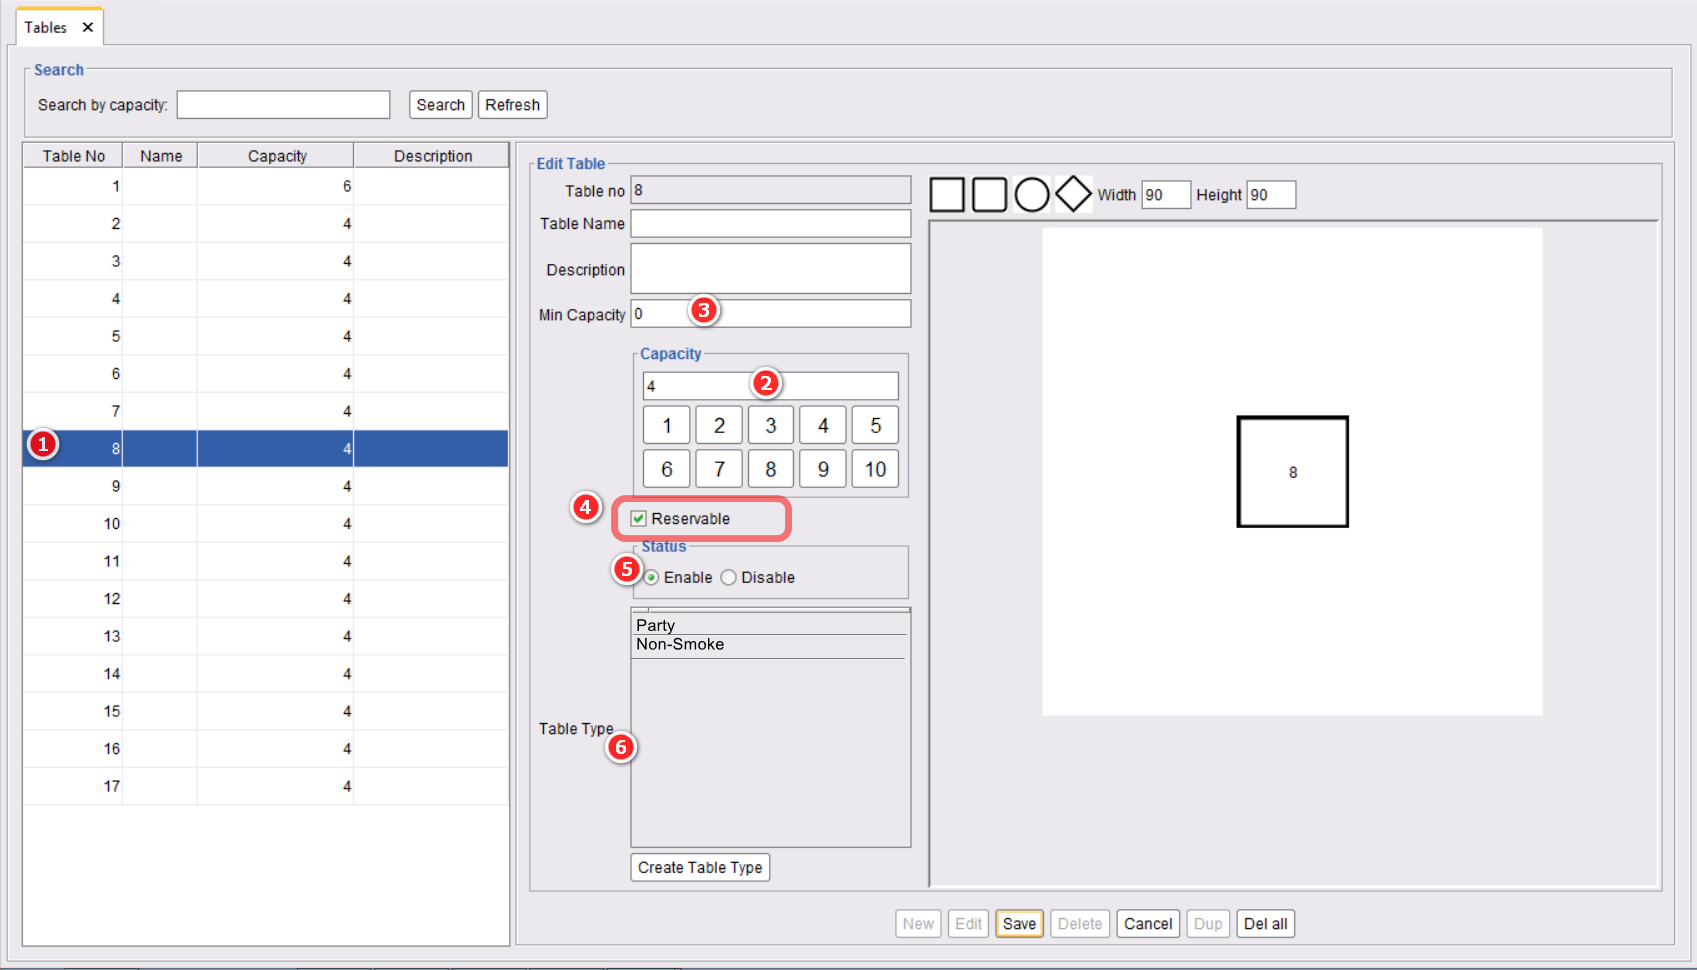
| Step | Action |
|---|---|
| 1️⃣ | Select the table you want to make reservable |
| 2️⃣ | Set Capacity (max guests, e.g., 4) |
| 3️⃣ | Set Min (minimum guests, e.g., 2 — prevents 1 person sitting at a 4-top during rush) |
| 4️⃣ | ✅ Check Reservable |
| 5️⃣ | ✅ Check Enable |
| 6️⃣ | (Optional) Choose Table Type — VIP, Window, Booth, etc. |
| 7️⃣ | Press OK to save |
If you set Min: 2, Max: 4 — the system won’t let you book a 1-person reservation on this table. Saves your big tables for big parties during peak hours.
2️⃣ Step 2: Open the Reservation Menu
On the Floor Plan view (Dine In screen), look for the “+” button at the upper-left corner of the grid. Tap it to expand the reservation menu.
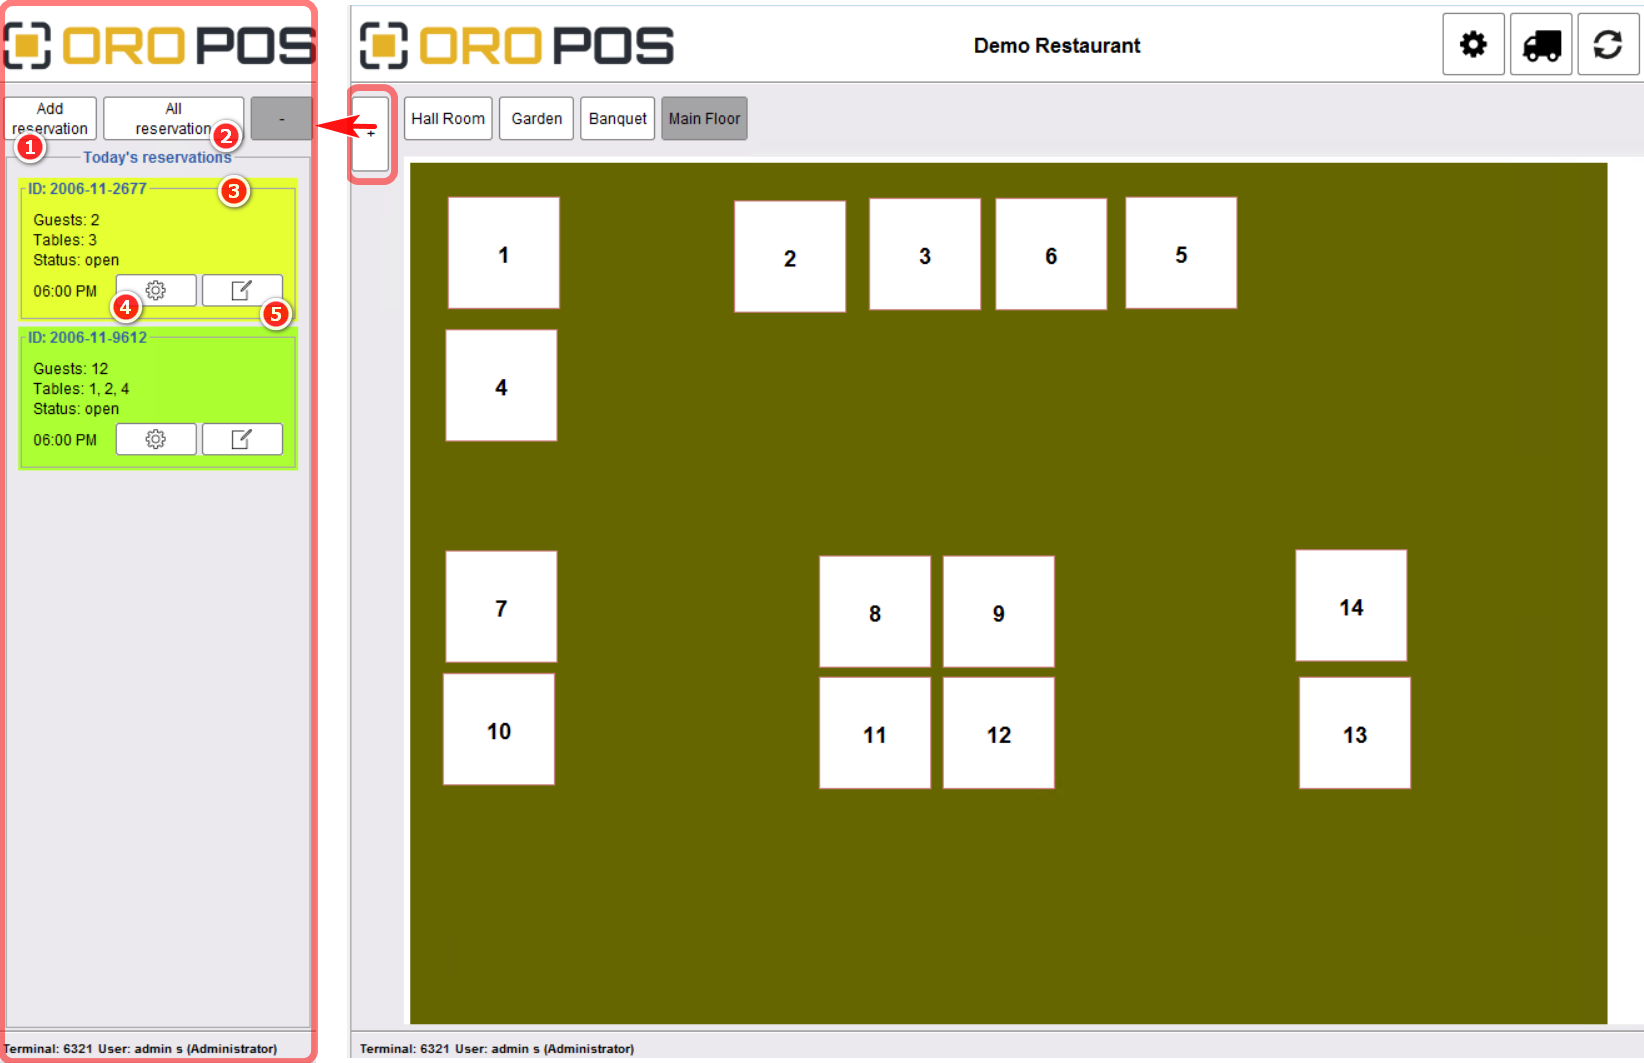
📋 The 5 Reservation Menu Actions
| # | Action | What It Does |
|---|---|---|
| 1️⃣ | Add Reservation | Create a new reservation |
| 2️⃣ | All Reservations | List of all active reservations |
| 3️⃣ | Today’s Reservations | Color-coded by time slot |
| 4️⃣ | Change Status | Cancel / No Show / Close / Delete |
| 5️⃣ | Edit Reservation | Change table or customer |
3️⃣ Step 3: Create a New Reservation

Step-by-Step
| Step | Action |
|---|---|
| 1 | Tap Add Reservation |
| 2 | Pick Date + Time (when guest will arrive) |
| 3 | Enter number of Guests |
| 4 | Select existing Customer or create new |
| 5 | Pick the Table(s) to reserve — each card shows #N (table number), Min, Max |
| 6 | Press OK to save |
📌 Real Example: Anniversary Dinner
John calls Tuesday morning:
“Hi, I’d like to book a window table for two for our anniversary on Friday at 7 PM.”
Host enters:
| Field | Value |
|---|---|
| From Date | Friday • 7:00 PM |
| To Date | Friday • 9:00 PM |
| Guests | 2 |
| Customer | John Smith (existing) |
| Tables | Table 21 (Window, 2-4 capacity) |
| Note | Anniversary — bring complimentary dessert |
4️⃣ Step 4: Update Reservation Status
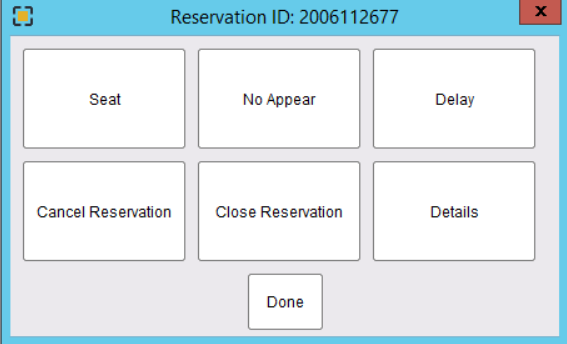
| Action | When to Use |
|---|---|
| 🚫 Cancel Booking | Customer called to cancel |
| ❌ No Appear | Customer didn’t show up after waiting (15-30 min past time) |
| 🗑️ Delete Booking | Booking entered by mistake — remove entirely |
| ✓ Close Booking | Reservation fulfilled — guests came and left |
- Cancel = Customer told you they couldn’t make it (logged for reports)
- No Show = Customer just didn’t appear (also logged)
- Delete = Booking shouldn’t have existed in first place (removed from records)
🔍 Search & List Reservations
Path: Back-Office → FloorPlan → Table Booking
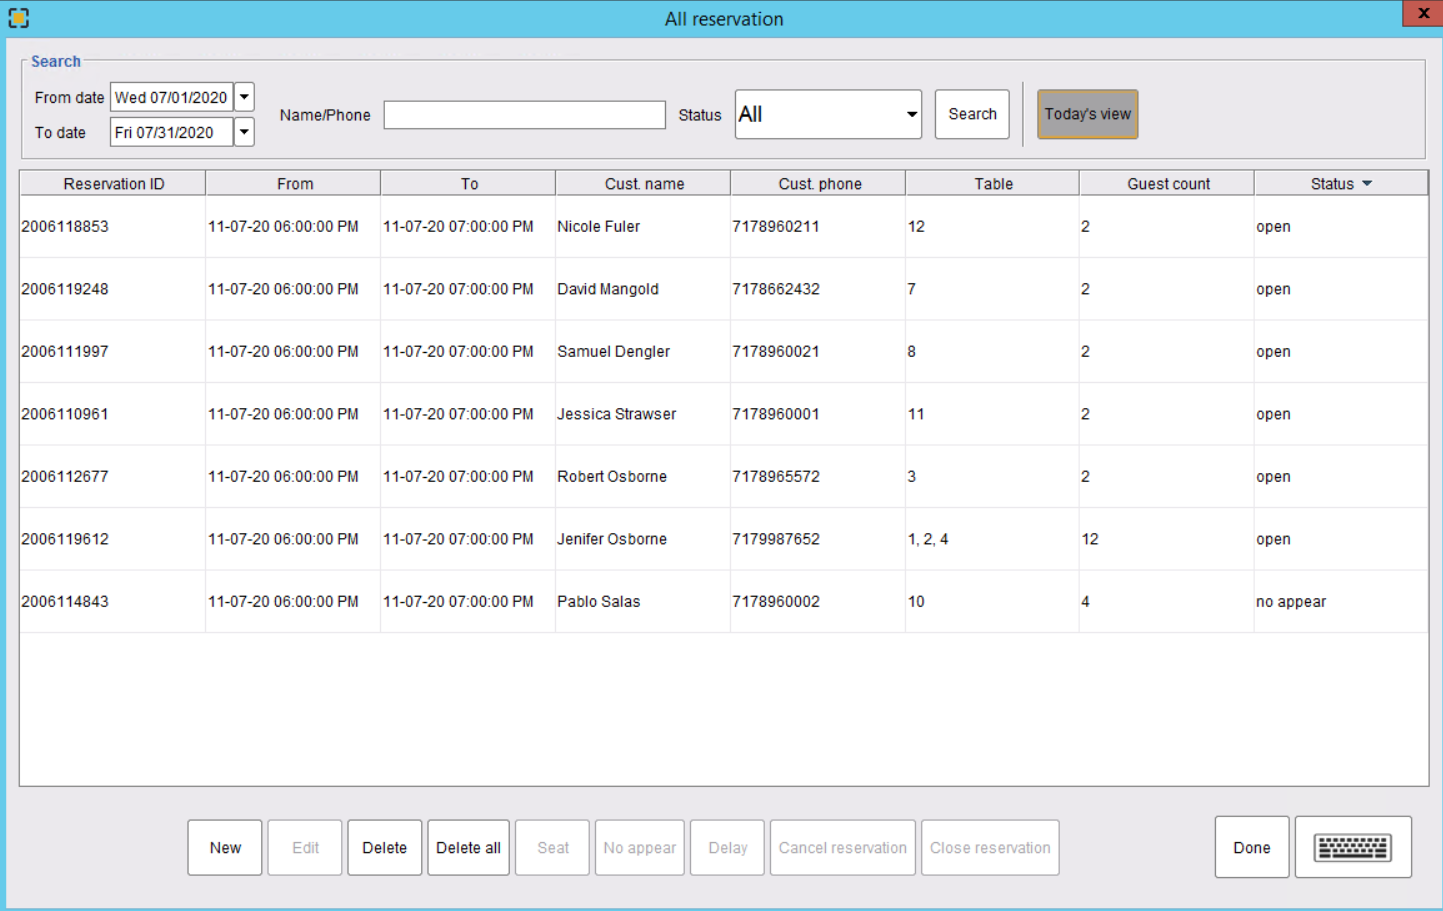
| Filter | Use For |
|---|---|
| 📅 Date | Filter to specific day’s reservations |
| 📊 Status | Open / Seated / Closed / No Show / etc. |
| 🔍 Search | Apply selected filters |
| 📆 Today’s View | Quick filter to today |
| ➕ New | Create reservation from back-office |
💼 Real-World Examples
🎂 Birthday Reservation
Sarah books a birthday dinner for 10 people, Saturday 7 PM.
- Host books Tables 5+6 (grouped) for 10 guests at 7 PM
- Note added: “Birthday — surprise dessert + candle”
- Saturday 6:55 PM — guests start arriving → host marks “Seated”
- 10 PM — meal complete → status “Closed”
📞 Friday Night Phone Booking
Phone rings at 11 AM Friday. Customer wants 6 PM table for 4.
- Host opens reservation menu → “Add Reservation”
- Picks Friday • 6 PM, 4 guests
- Searches “Mike Johnson” → existing customer found
- Available tables show: Tables 5, 7, 12 (capacity 4)
- Picks Table 7 (window) → OK
- Friday 6 PM, table is held — staff seats Mike’s family without delay
🚫 Customer Cancels
30 minutes before reservation, customer calls to cancel.
- Host opens “Today’s Reservations” → finds the booking
- Taps “Cancel Booking”
- Table immediately available for walk-ins
- Cancellation logged for end-of-month report (track no-show patterns)
👻 No Show
7:30 PM — booking was for 7 PM, customer never arrived.
- Host waited 30 min — calls customer, no answer
- Marks reservation as “No Appear”
- Table released for walk-ins
- Customer flagged in system — repeat no-shows can be required to pre-pay future bookings
🪑 Walk-In During a Reserved Period
6:30 PM — Walk-in family of 4 wants to be seated.
- Host checks reservations: Table 7 booked at 7 PM, but free now
- Host explains: “We can seat you, but the table is reserved at 7 PM. Will you be done by then?”
- If yes → seat them, system shows “Reserved at 7 PM” warning
- If no → direct them to non-reservable Table 11
⭐ Best Practices
| Tip | Why |
|---|---|
| Reserve only 50-70% of tables | Walk-ins still need seats |
| Set Min capacity on big tables | Don’t waste 6-tops on 2-person bookings |
| Always capture customer info | Phone number lets you call to confirm |
| Add notes for special occasions | Birthday/anniversary = great service moments |
| Mark No-Show / Cancel properly | Reports help identify problem patterns |
| Wait 15-30 min before No-Show | Customers may be running late |
| Use Table Type (VIP/Window/Booth) | Easier to fulfill specific guest preferences |
| Confirm bookings day before | Drastically reduces no-shows |
📚 Related Guides
| → Table Service Manager’s Guide | → FloorPlan Configuration | → Adding Tables |
📞 Need More Help?
Visit guide.orocube.com or contact helpdesk@orocube.net