
🏷️ Kitchen Item Stickers
A Kitchen Item Sticker is a small printed label that gets attached directly to a product (cup, sandwich, takeout box) — showing the customer’s name, order details, and modifications. It’s the magic behind how Starbucks knows your cup is yours, and how busy delis don’t mix up sandwiches.

Each item gets its own little label — printed automatically when sent to the kitchen. Sticks right on the cup, container, or wrapper. No more shouting “Whose iced caramel macchiato is this?”
🎯 Why Use Kitchen Stickers?
| Problem | How Stickers Solve It |
|---|---|
| 😕 Customers can’t tell which drink is theirs | Name + order printed on cup |
| 🤯 Barista forgets modifications | All mods printed on sticker (e.g., “no whip, oat milk, extra shot”) |
| 📦 Wrong sandwich handed to wrong customer | Order # + name on the wrapper |
| ⏱️ Slow service during rush hour | Staff just reads the sticker, no asking |
| 🚫 Allergy mistakes | “DAIRY ALLERGY” prints on the label |
| 📅 Food safety dates | Date/time of prep printed for tracking |
🏪 Where It’s Useful
| Business Type | How They Use It |
|---|---|
| ☕ Coffee Shops | Customer name + drink + mods on the cup (Starbucks style) |
| 🥪 Sandwich Shops / Subway | Order # + customer name + bread/sauce on wrapper |
| 🍔 Quick-Service Restaurants | Order # on takeout boxes for pickup counter |
| 🥡 Delivery / Pickup | Customer name + delivery address on each container |
| 🍩 Bakeries | Item name + ingredients (allergy info) |
| 🍣 Sushi / Asian Cuisine | Roll name + customer + table number |
| 🧁 Ice Cream / Dessert Shops | Flavor + toppings + customer name |
| 🍵 Bubble Tea / Boba Shops | Sugar level + ice level + toppings on cup |
☕ The Starbucks Example (You’ve Seen This)
Walk into any Starbucks. You order. The barista calls your name when ready. Magic? Nope — it’s Kitchen Item Stickers.
Starbucks-style sticker with customer name, drink, and modifications
What You Typically See on a Starbucks Cup:
| Element | Example |
|---|---|
| 👤 Customer Name | “Sarah” |
| 🍹 Drink Name | Iced Caramel Macchiato |
| 📏 Size | Grande |
| 🥛 Modifications | Oat milk, no whip, extra shot |
| 🕐 Time / Order # | 10:34 AM • #142 |
- 👀 Customer can verify their order on pickup
- 📝 Barista has all info — no memorization needed
- 🚀 Speeds up rushes — multiple drinks made in parallel
- ✅ Reduces errors — name visible at handoff
⚙️ How to Set Up Kitchen Stickers
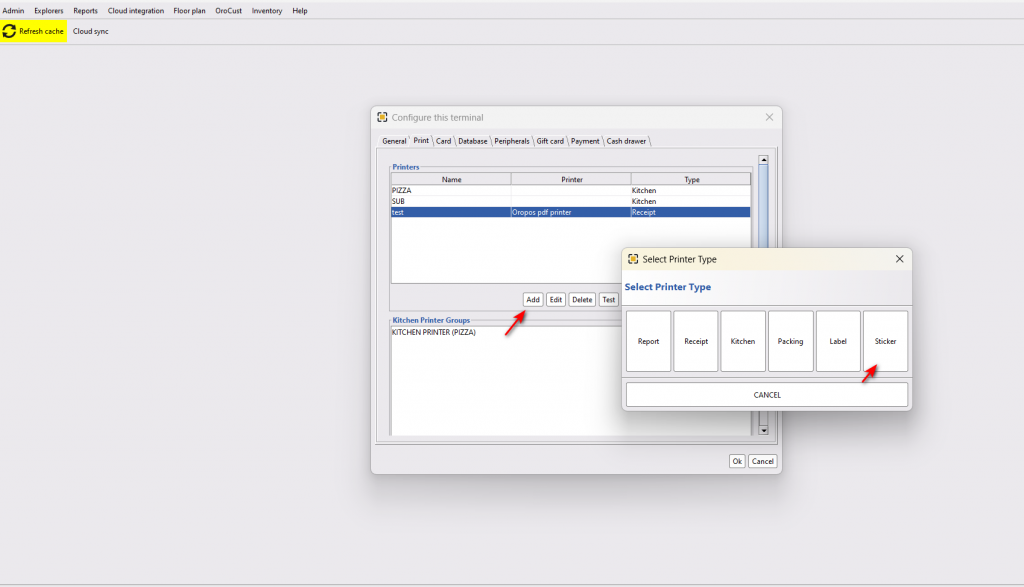
Step 1: Add a Sticker Printer in Back-Office
Path: Back-Office → Terminal Configuration → Print → Add → Sticker Printer
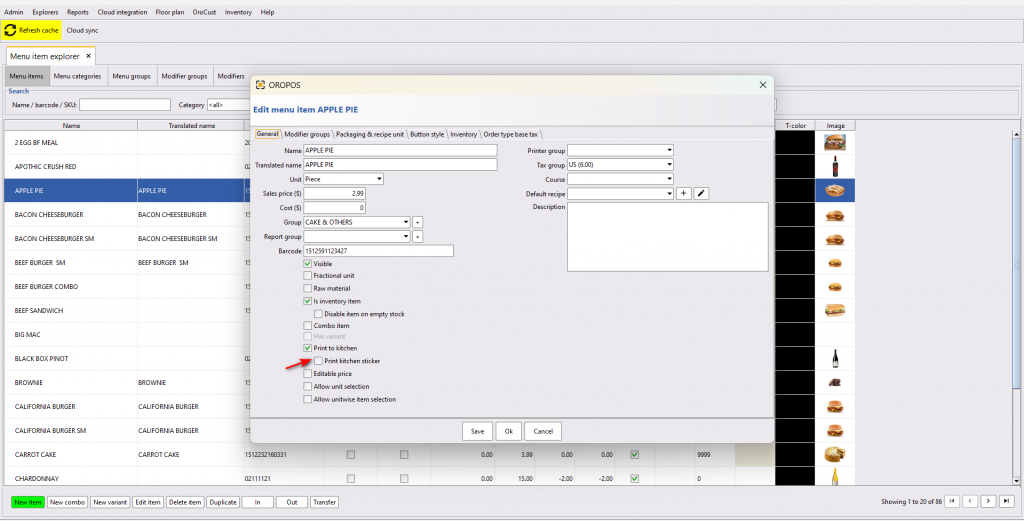
🍔 Step 2: Enable on Menu Items
Each item that should print a sticker must have it enabled individually.
Path: Back Office → Explorers → Menus & Others → (Edit Item)
Now when you send the order to the kitchen, each item with sticker enabled prints on its own sticker:

You don’t need to put stickers on EVERY item. Enable only for items where it matters:
- ✅ Drinks → cup labels
- ✅ Sandwiches → wrapper labels
- ✅ Takeout entrees → box labels
- ❌ Side of fries → no sticker needed
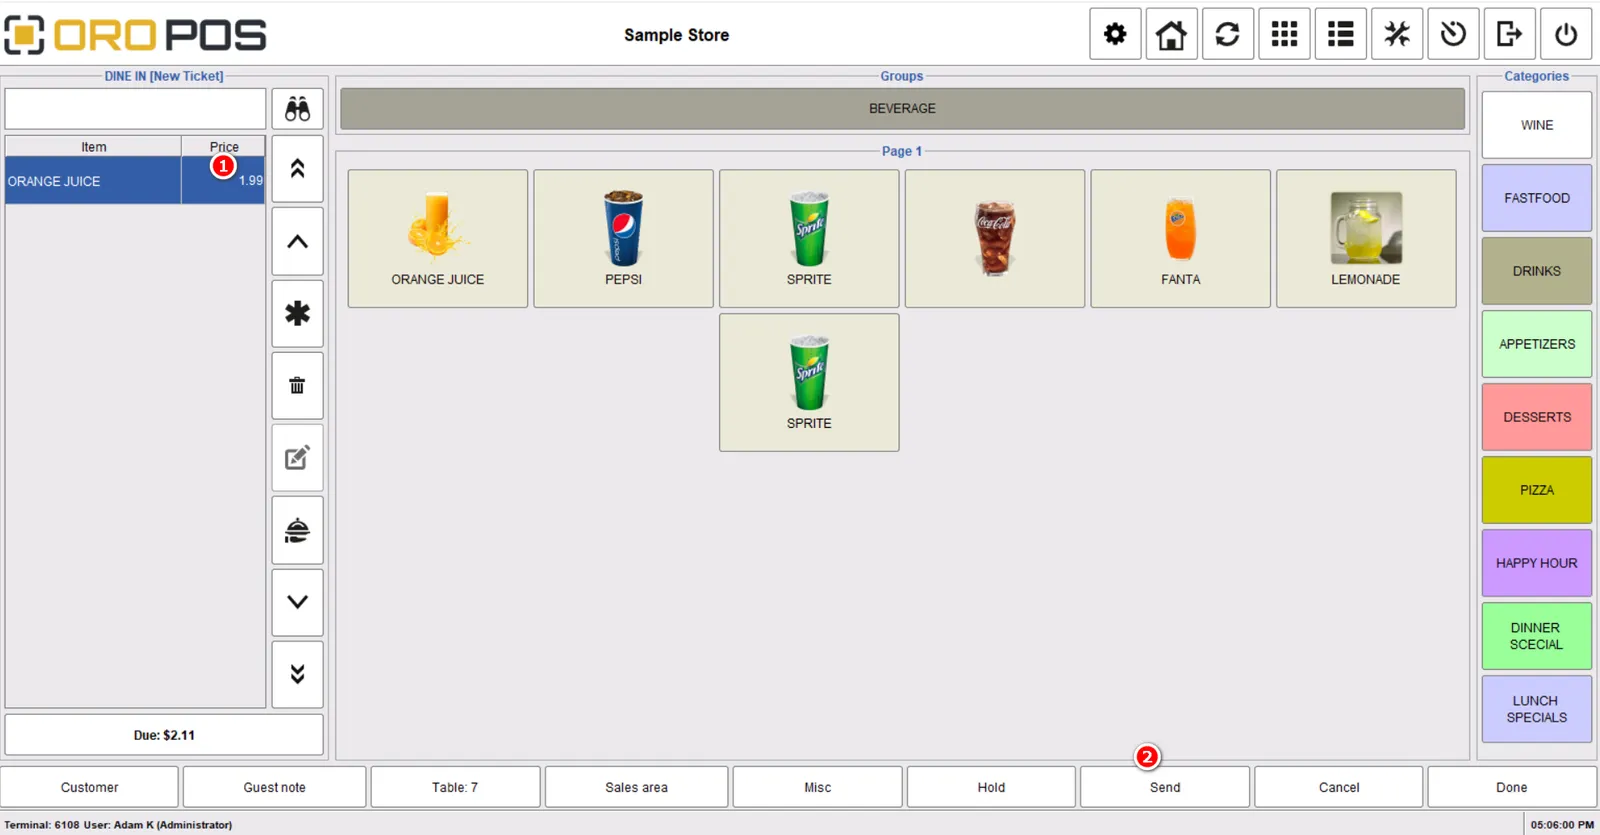
👤 Step 3: Add Customer Name to Sticker
This is what makes it Starbucks-style. Use the Guest Note field to capture the customer’s name.
How to Capture the Name
| Step | Action |
|---|---|
| 1 | Open the Order Type (e.g., Take Out) |
| 2 | Click Guest Note |
| 3 | Enter the customer’s name (e.g., “Sarah”) |
| 4 | Add menu items (those with sticker enabled) |
| 5 | Send → sticker prints with name on it 🎉 |


🖨️ Supported Printers & Sticker Sizes
Any label printer that supports these sticker sizes:
| Size | Common Use |
|---|---|
| 2″ × 3″ | Standard receipt-style stickers |
| 2.125″ × 2.75″ | Coffee cup labels |
| 2.15″ × 3.14″ | Larger food container labels |
See the Recommended Hardware page for tested label printers.
💼 Real-World Examples
📌 Example 1: Coffee Shop Morning Rush
8:15 AM Tuesday at “Bean & Brew”
- Sarah orders Iced Caramel Macchiato w/ oat milk, no whip — Guest Note: “Sarah”
- Mike orders Hot Latte, extra shot — Guest Note: “Mike”
- Linda orders Iced Americano + Croissant — Guest Note: “Linda”
Stickers print, baristas grab cups, attach stickers, make drinks in parallel. Customers pick up by name when called. Zero confusion.
📌 Example 2: Subway-style Sandwich Shop
Order # 42 — Customer “John” — Italian BMT, wheat bread, extra mayo, no onions
- Sticker prints with all info
- Sandwich-maker reads sticker, makes sandwich
- Sticker goes on the wrapper
- Cashier calls “John, Order 42” → John walks up, sees his name on the wrapper, takes it
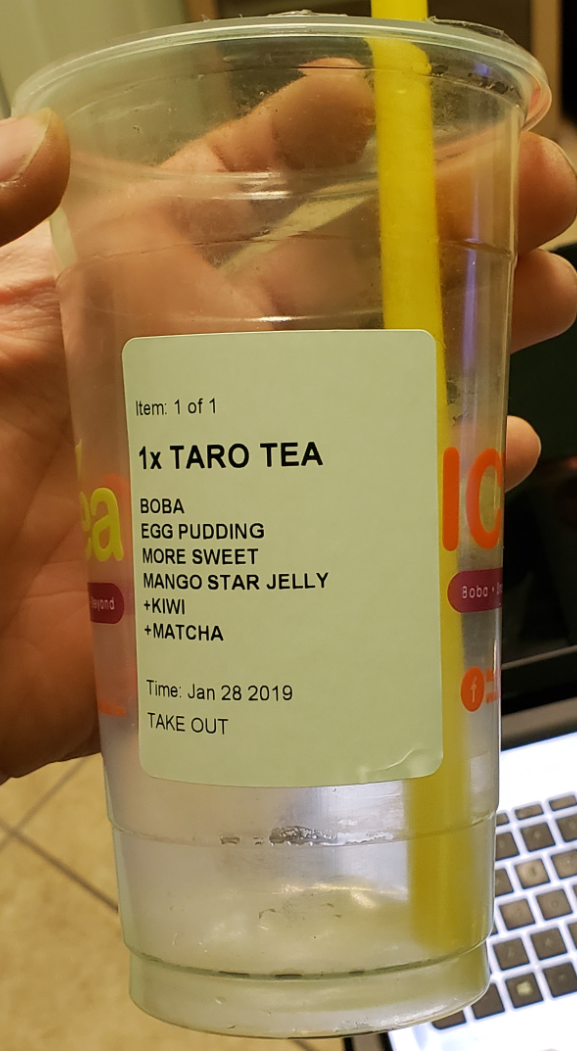
📌 Example 3: Bubble Tea Shop
Customer “Amy” orders Taro Milk Tea, 50% sugar, less ice, with boba and pudding.
Sticker shows: “Amy • Taro Milk Tea • 50% sugar • Less ice • Boba + Pudding”
Tea-maker has zero ambiguity. Customer sees name → picks up confidently.
⭐ Best Practices
| Tip | Why |
|---|---|
| Only enable on items where it matters | Saves stickers, reduces clutter |
| Always ask the customer’s name | No name = no Starbucks-style benefit |
| Use Guest Note for the name | It’s the field that prints on the sticker |
| Position printer near the prep station | Staff grabs sticker the second it prints |
| Keep extra label rolls on hand | Running out kills the workflow |
| Make sure modifiers print clearly | “No whip, oat milk” must be readable |
📚 Related Guides
| → Kitchen Printer | → Receipt Printer | → Recommended Hardware |
📞 Need More Help?
Visit guide.orocube.com or contact helpdesk@orocube.net