

📍 Inventory Location Setup
An Inventory Location is any place where you store stock — a warehouse, a fridge, a shelf, a bin, or even a logical area like “Sales Floor”. ORO POS uses locations to track where each item lives, not just how many you have.
If your stock is in 3 different fridges and a walk-in cooler, you want to know which fridge is empty before someone walks 50 feet to check. Locations track that.
📦 What Counts as a “Location”?
A location can be anything physical or logical:
| Type | Examples |
|---|---|
| 🏠 Physical area | Warehouse, Walk-in Cooler, Dry Storage, Bar, Kitchen |
| 🗄️ Storage units | Shelf, Bin, Fridge #1, Fridge #2, Freezer |
| 📍 Zone | Front of House, Back of House, Patio Bar, Server Station |
| 🧠 Logical area | Sales, Main, Default, Showroom, In-Transit |
Each location has a unique name (or ID) — so the system knows exactly where stock is.
🏪 The Default “Store” Location
ORO POS automatically creates a default location named “Store”. Here’s what it does:
| Action | What Happens (with default) |
|---|---|
| 📥 You purchase stock | Added to “Store” (default IN) |
| 📤 Cashier sells item | Deducted from “Store” (default OUT) |
For small stores, the default “Store” might be all you need. For bigger setups, you’ll create more locations.
📥📤 IN vs OUT Locations
A location can be the default IN, the default OUT, or both — or neither (just a storage spot).
| Setting | Meaning |
|---|---|
| 📥 Default IN | Where new purchases land by default (e.g., “Warehouse”) |
| 📤 Default OUT | Where sold items deduct from (e.g., “Sales Floor”) |
| 🚫 Neither | A storage-only location (you transfer stock to/from it manually) |
📌 Real Example: Restaurant Setup
| Location | Default IN | Default OUT |
|---|---|---|
| Main Storage | ✅ | ❌ |
| Kitchen Prep | ❌ | ✅ |
| Bar Cooler | ❌ | ❌ (storage only) |
Workflow: Sysco delivers → goes to Main Storage (default IN). Manager transfers to Kitchen Prep. Cashier sells food → deducts from Kitchen Prep (default OUT).
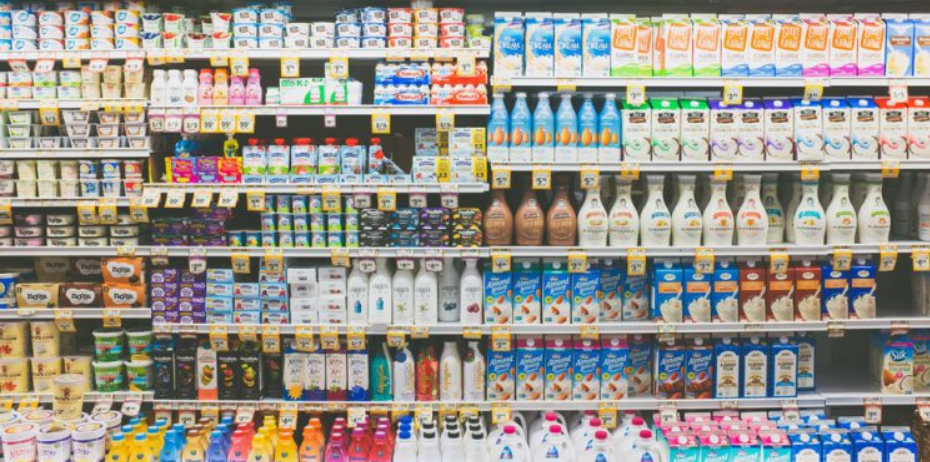
📝 How to Create a Location
Path: Back-Office → Inventory → Locations
| Step | Action |
|---|---|
| 1 | Click New |
| 2 | Enter the location name (e.g., “Walk-in Cooler”) |
| 3 | Optionally check Default IN and/or Default OUT |
| 4 | Click Ok to save |
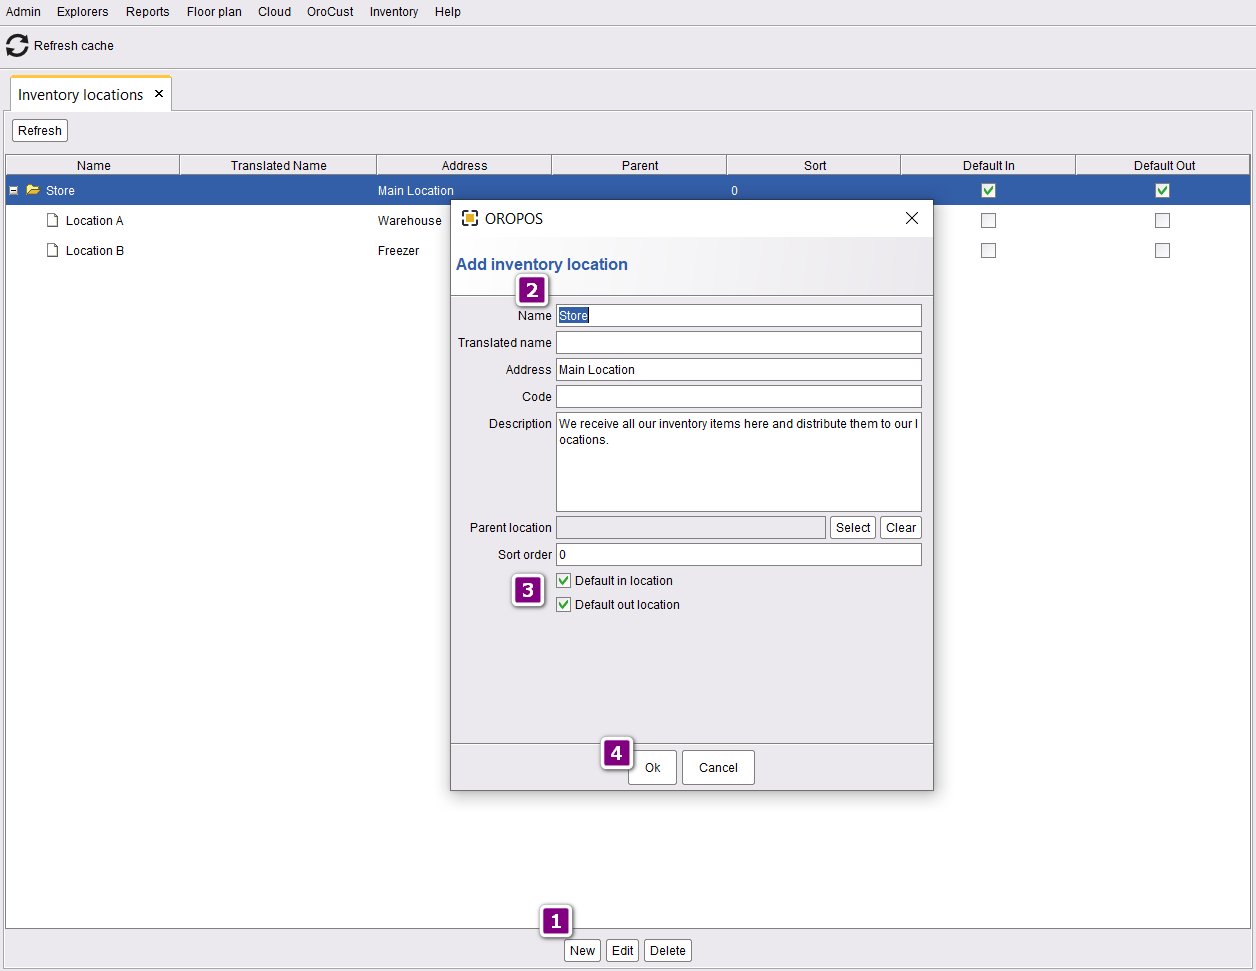
🌳 Child / Parent Locations
You can nest locations. For example, a Bin can live inside a Shelf, which lives inside the Warehouse.
📌 Real Example: Warehouse Hierarchy
🏭 Warehouse (parent)
   └─ 📚 Shelf A (parent)
   │     ├─ 📦 Bin A1
   │     ├─ 📦 Bin A2
   │     └─ 📦 Bin A3
   └─ 📚 Shelf B (parent)
         ├─ 📦 Bin B1
         └─ 📦 Bin B2
How to Create a Child Location
| Step | Action |
|---|---|
| 1 | Click New |
| 2 | Name it (e.g., “Bin A1”) |
| 3 | Choose Parent Location (e.g., “Shelf A”) |
| 4 | Leave Default IN/OUT blank — child bins are storage-only |
| 5 | Click Ok to save |
Child bins are usually just for organization. You don’t want every purchase to dump into a specific bin — manually transfer items from the main location into specific bins as needed.
💼 Real-World Examples
📌 Example 1: Small Café (Single Location)
One small café with everything in one storage area. Just use the default “Store” location. No setup needed.
Total locations: 1 (default)
📌 Example 2: Restaurant with Bar (2 Sales Areas)
| Location | Role |
|---|---|
| Main Storage | 📥 Default IN |
| Kitchen | 📤 Default OUT for food terminals |
| Bar Cooler | 📤 Default OUT for bar terminal |
Using Location Settings by Terminal (in Inventory Configuration), each cashier station deducts from its own area.
📌 Example 3: Multi-Outlet Restaurant Chain
| Location | Type |
|---|---|
| Central Warehouse | 📥 Receives all bulk orders |
| Outlet A — Storage | Storage only |
| Outlet A — Sales | 📤 OUT for Outlet A |
| Outlet B — Storage | Storage only |
| Outlet B — Sales | 📤 OUT for Outlet B |
Workflow: Stock arrives at Central Warehouse → transferred to Outlet Storage → transferred to Outlet Sales → deducts on customer purchase.
📌 Example 4: Retail Store with Bins
🏪 Showroom (📤 Default OUT)
🏭 Warehouse (📥 Default IN)
   └─ Shelf A
   │     ├─ Bin A1 — Small T-Shirts
   │     ├─ Bin A2 — Medium T-Shirts
   │     └─ Bin A3 — Large T-Shirts
   └─ Shelf B
         ├─ Bin B1 — Caps
         └─ Bin B2 — Mugs
When customers buy a Medium T-Shirt, it deducts from Showroom (default OUT). Restock by transferring from Bin A2 → Showroom.
⭐ Best Practices
| Tip | Why |
|---|---|
| Start with just the default “Store” | Don’t over-engineer; add locations as your needs grow |
| Use clear, unique names | “Bar Fridge 1” beats just “Fridge” |
| Only one default IN and one default OUT per terminal | Avoids conflicts |
| Use Inventory Configuration to set per-terminal locations | Different terminals can use different OUT locations |
| Use Inventory Transfer between locations | Track movement of stock as it moves around |
| Don’t make child bins default IN/OUT | They’re for organization, not auto-routing |
📚 Related Guides
| → Inventory Setup | → Inventory Transfer | → Stock In / Out |
📞 Need More Help?
Visit our knowledge base at guide.orocube.com or contact support at helpdesk@orocube.net