
💳 Custom Payments in ORO POS
Custom Payments let you accept money from sources ORO POS doesn’t directly integrate with — like a standalone credit card terminal, Uber Eats, gift cards, store credit, or even an IOU. Each custom payment becomes its own button on the settle screen and shows up separately in reports.
Think of Cash and Credit Card as built-in payment buttons. Custom Payments let you add your own buttons — “Uber Eats”, “Grubhub”, “Gift Card”, “House Account”, “External Terminal” — so each can be tracked and reported separately.
🎯 When to Use Custom Payments
| Situation | Example |
|---|---|
| 📟 Standalone credit card terminal | You swipe on a separate Verifone, want to record sale in ORO POS |
| 🌍 Outside USA / no integrated processor | Stores in countries where ORO POS doesn’t auto-process cards |
| ⚡ Power outage or internet down | Backup payment method when primary processor fails |
| 🍔 3rd-party food delivery | Uber Eats, Grubhub, DoorDash — they pay you separately, but you record the order |
| 🎁 Gift cards / Store credit | Customer redeems a $25 gift card at checkout |
| 📒 House account / IOU | Regular customer pays end of week |
💼 Real-World Examples
🍔 Example 1: Uber Eats Order
Scenario: A customer orders 2 burgers ($24.50) through Uber Eats. The driver picks up. Uber Eats pays you (minus their commission) at the end of the week.
You want to:
- Send the burgers to the kitchen ✅
- Record the sale in ORO POS reports ✅
- Keep Uber Eats sales separate from cash & card ✅
Solution: Create a custom payment button called “Uber Eats”. When the order comes in, ring it up → tap “Uber Eats” → enter Uber’s order ID as the reference → done. End of month, the Custom Payments Report shows exactly how much Uber Eats owes you.
📟 Example 2: Standalone Verifone Terminal
Scenario: Your café uses a standalone Verifone for credit cards (not integrated with ORO POS). Customer’s bill is $18.75.
Steps:
- Cashier rings up the order in ORO POS → total = $18.75
- Cashier swipes the card on the Verifone → terminal approves with confirmation #78421
- Back in ORO POS → tap custom payment button “External Card” → reference: 78421
- Sale closed. Now your daily report includes that $18.75.
🎁 Example 3: Gift Card Redemption
Scenario: Customer’s birthday gift card balance is $50. Their bill: $32.
Steps:
- Ring up order ($32)
- Tap custom button “Gift Card“
- Reference: gift card # (e.g., GC-2024-0117)
- Sale closed; gift card redemptions easy to spot in Custom Payment Report
⚡ Example 4: Power Outage Backup
Scenario: Internet is down. Integrated card reader can’t process. Customer pays with their card via your manual imprint slip.
Steps:
- Ring up order normally
- Tap custom button “Manual Card“
- Reference: last 4 of card # (e.g., 4321)
- Process the imprint slip later when systems return
1️⃣ Step 1: Create a Custom Payment Button
Path: Back-Office → Admin → Custom Payment → New
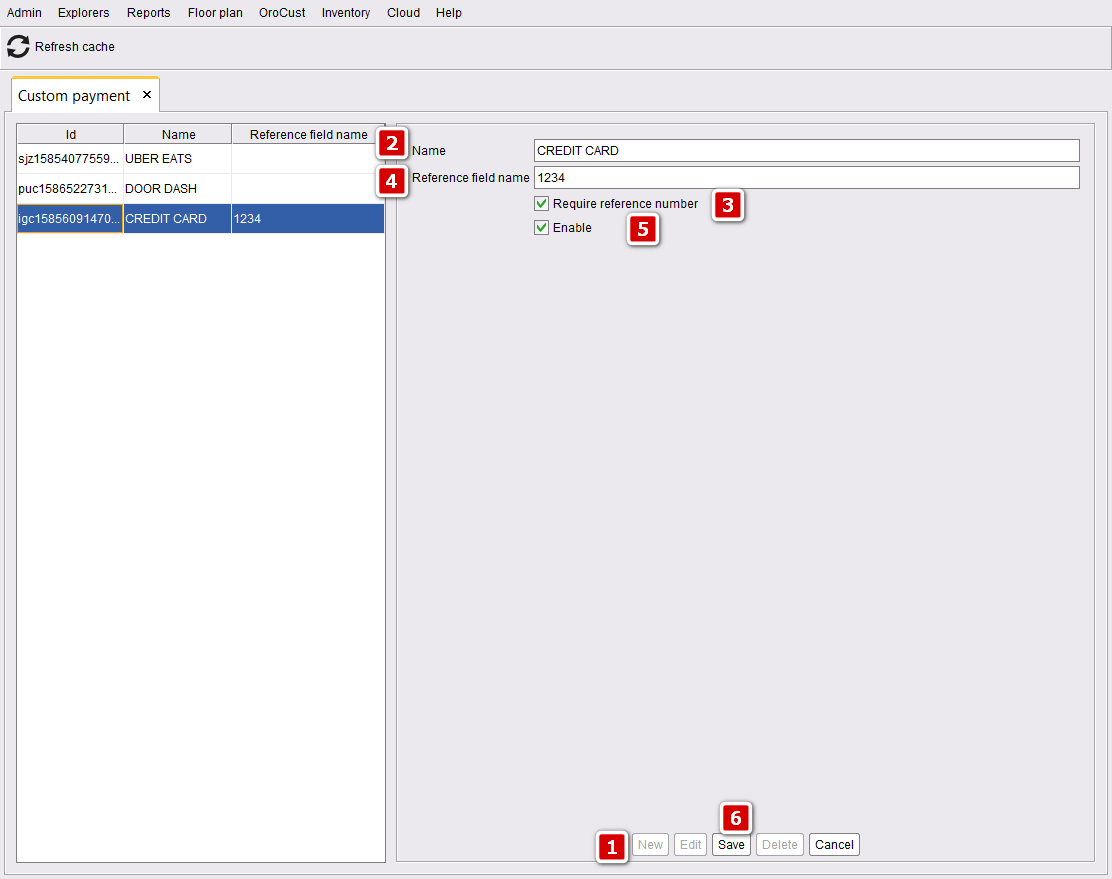
| Field | What It Means | Example |
|---|---|---|
| Name | What appears on the button | “Uber Eats” |
| Require Reference | Force cashier to enter a code at every payment | ✅ ON for Uber Eats (capture order ID) |
| Reference Prompt | Label shown when cashier is asked for the reference | “Uber Order #” |
| Enable | Turn this button on/off | ✅ ON |
| Save | Commit changes | Press OK |
Turn it ON when you’ll need to cross-check the payment later — Uber Eats order ID, gift card #, manual card last-4. Leave OFF for things like “Tip Jar Cash” or “Comp” where there’s nothing to look up.
2️⃣ Step 2: Show the Button on the Settle Screen
Path: Back-Office → Admin → Terminal Configuration → Payment → ✅ “Show custom payments button as individual buttons”
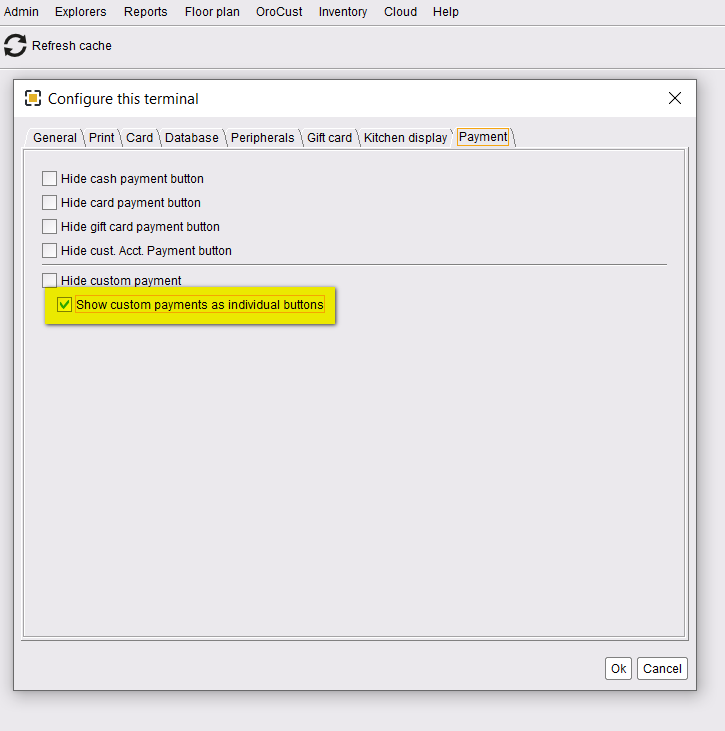
If you skip this, your custom payment buttons exist but the cashier can’t see them on the payment screen. They’ll be hidden behind a generic “Other” menu.
3️⃣ Step 3: Take an Order Using Custom Payment
Ring up the order normally (Dine-In, Take-Out, Bar, etc.), then on the Settle screen, tap your custom payment button.
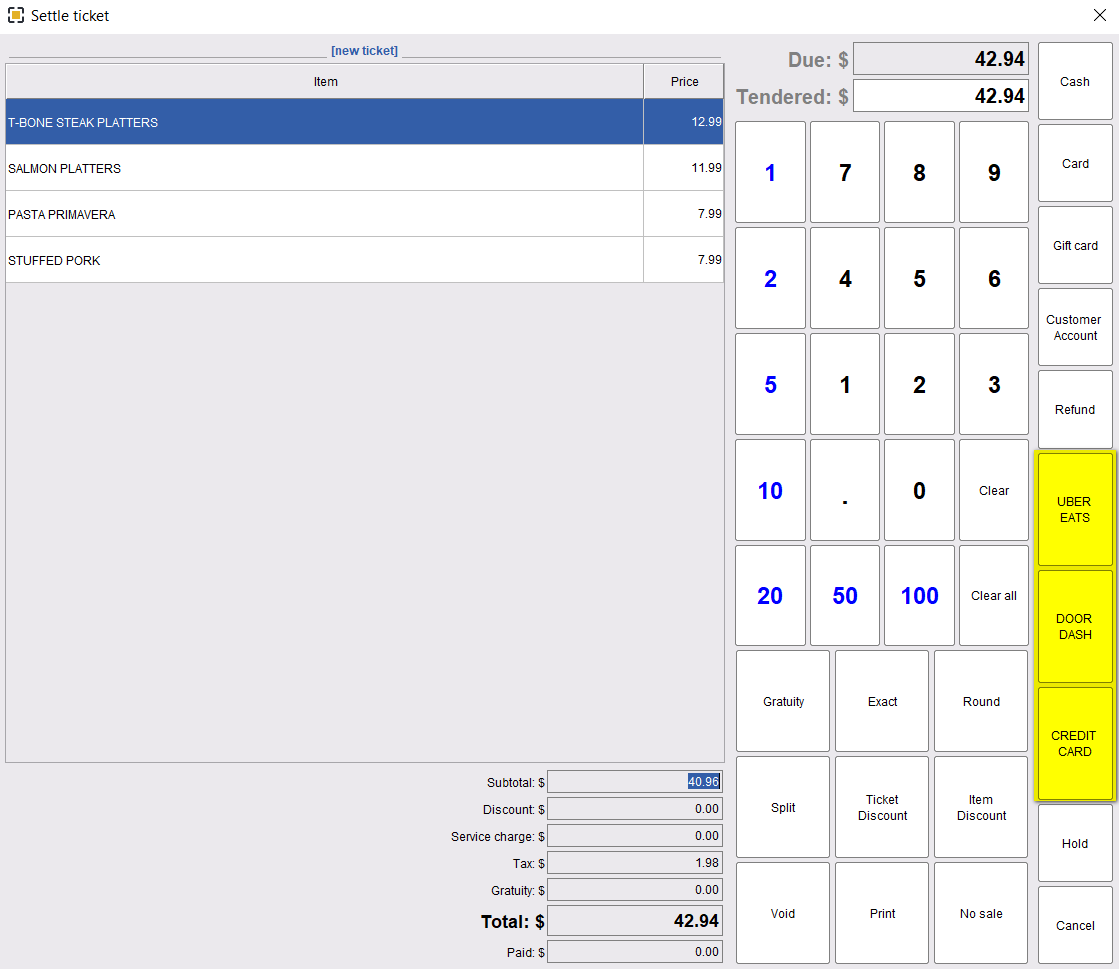
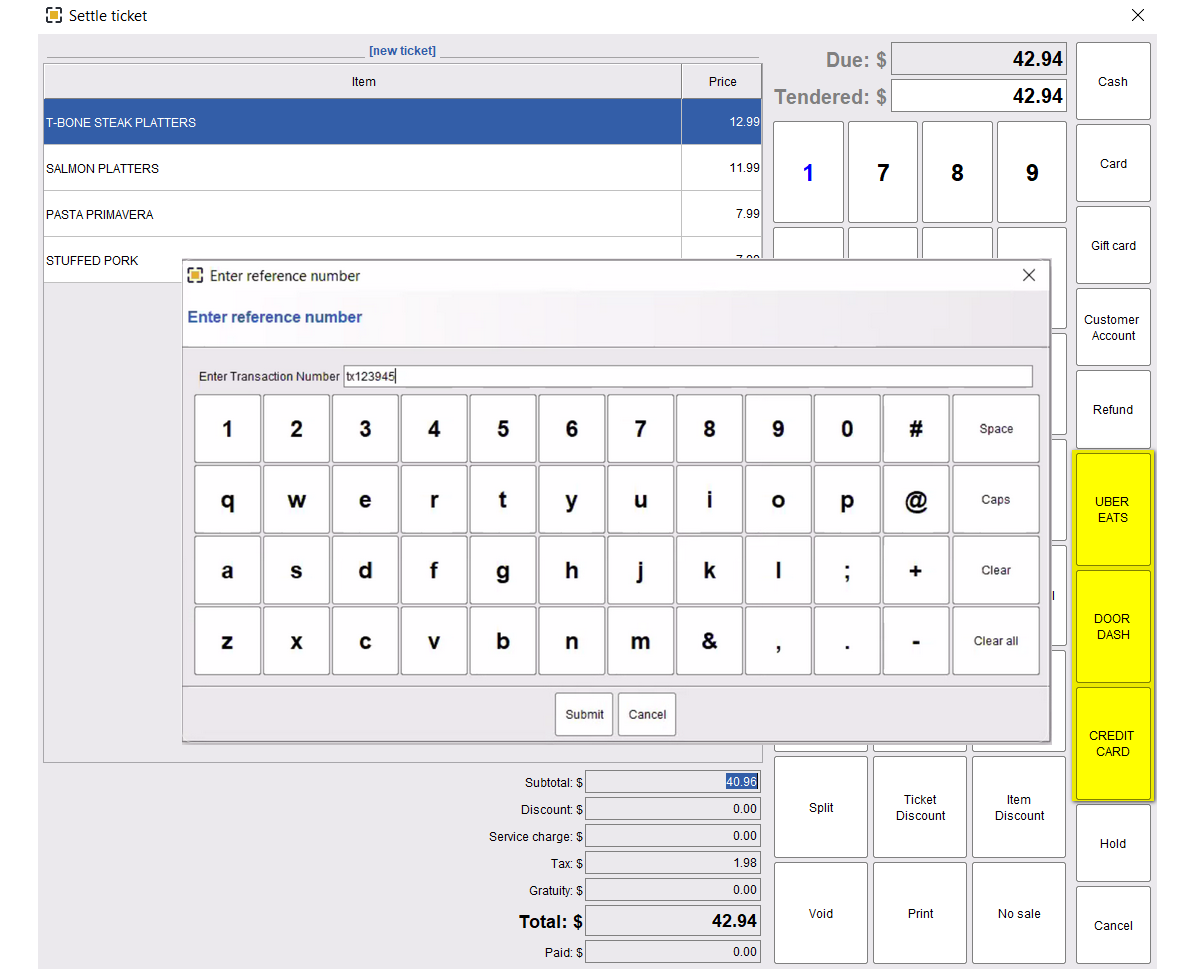
If the button has Require Reference enabled, ORO POS asks for the reference number every time. Enter it and confirm.
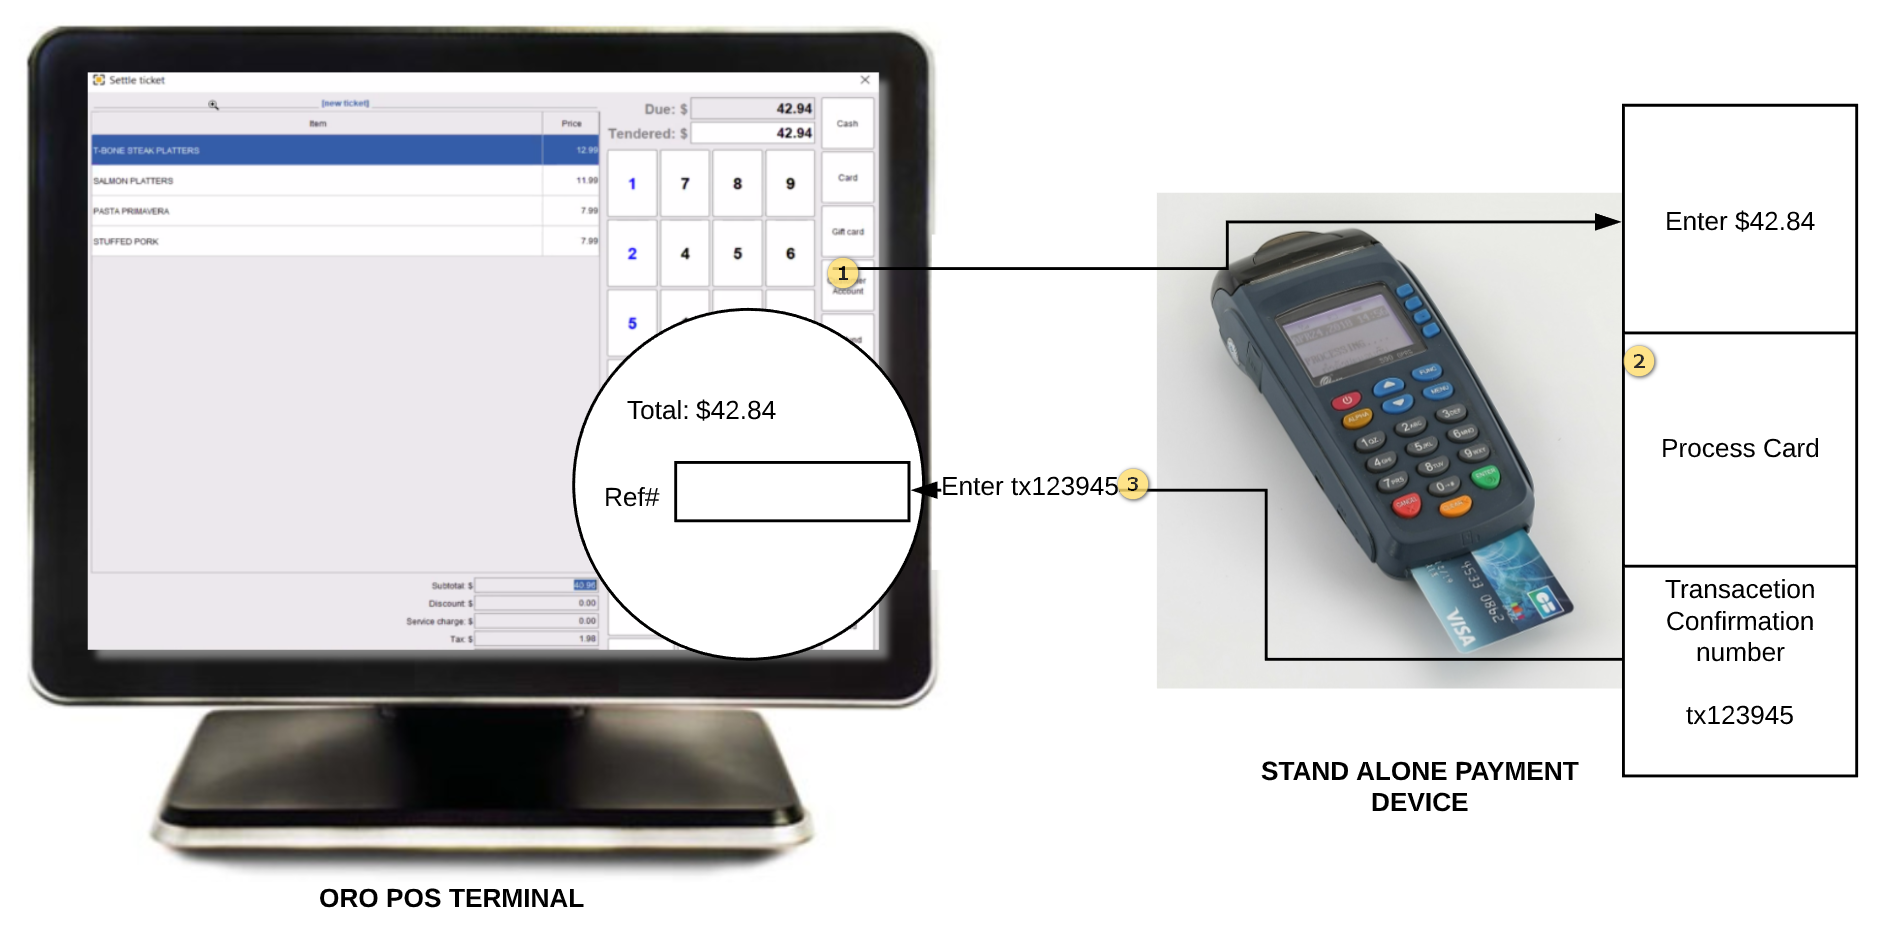
4️⃣ Standalone Card Terminal Workflow
For stores using a separate (non-integrated) credit card terminal:
| Step | Action |
|---|---|
| 1️⃣ | Ring up the order in ORO POS, go to settle |
| 2️⃣ | Tap your custom payment button (e.g., “External Card”) |
| 3️⃣ | Walk to the standalone terminal, manually key the total amount, swipe/tap card |
| 4️⃣ | Get the approval / confirmation number from the terminal |
| 5️⃣ | Back in ORO POS, enter that confirmation # in the reference field → Done |
5️⃣ Custom Payments Report
Path: Back-Office → Reports → Card & Custom Payments Report → Pick date range → Search
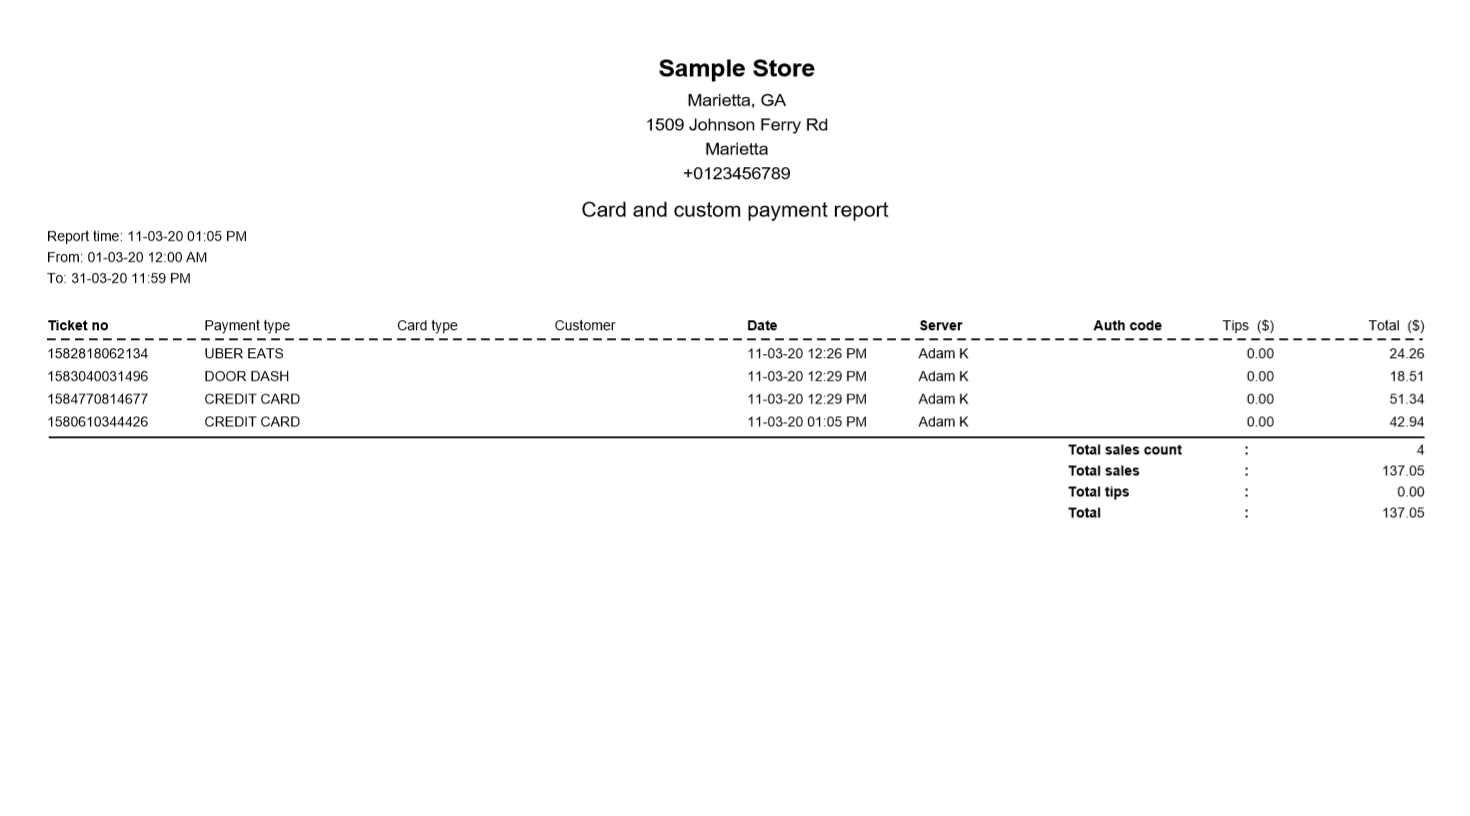
📊 Sample Report — Friday, May 5
| Payment Type | Transactions | Total |
|---|---|---|
| Uber Eats | 12 | $284.50 |
| Grubhub | 8 | $176.20 |
| External Card (Verifone) | 23 | $612.75 |
| Gift Card | 3 | $75.00 |
| Total Custom | 46 | $1,148.45 |
⭐ Best Practices
| Tip | Why |
|---|---|
| One button per source (Uber Eats, Grubhub, DoorDash separately) | Easier reconciliation when each provider sends their statement |
| Always require reference for delivery apps | Lets you match POS sale to provider order ID later |
| Disable buttons you no longer use | Cleaner settle screen, less cashier confusion |
| Run Custom Payments Report weekly | Reconcile against Uber/Grubhub deposits, gift card liability |
| Use clear names (“Uber Eats” not “UE”) | Cashiers won’t tap the wrong button under pressure |
Unlike integrated credit card processing, custom payments don’t capture or secure customer card data. They’re just like a Cash button — they record that money was received, nothing more. Never use a custom payment to “type in a card number.”
📚 Related Guides
| → Dejavoo Terminal Setup | → Service Charge | → Void & Refund |
📞 Need More Help?
Visit guide.orocube.com or contact helpdesk@orocube.net