Simply go to back-office–> admin –> receipt configuration–> add the barcode parameter to your selected ticket section–> check the preview and save changes by clicking on SAVE.
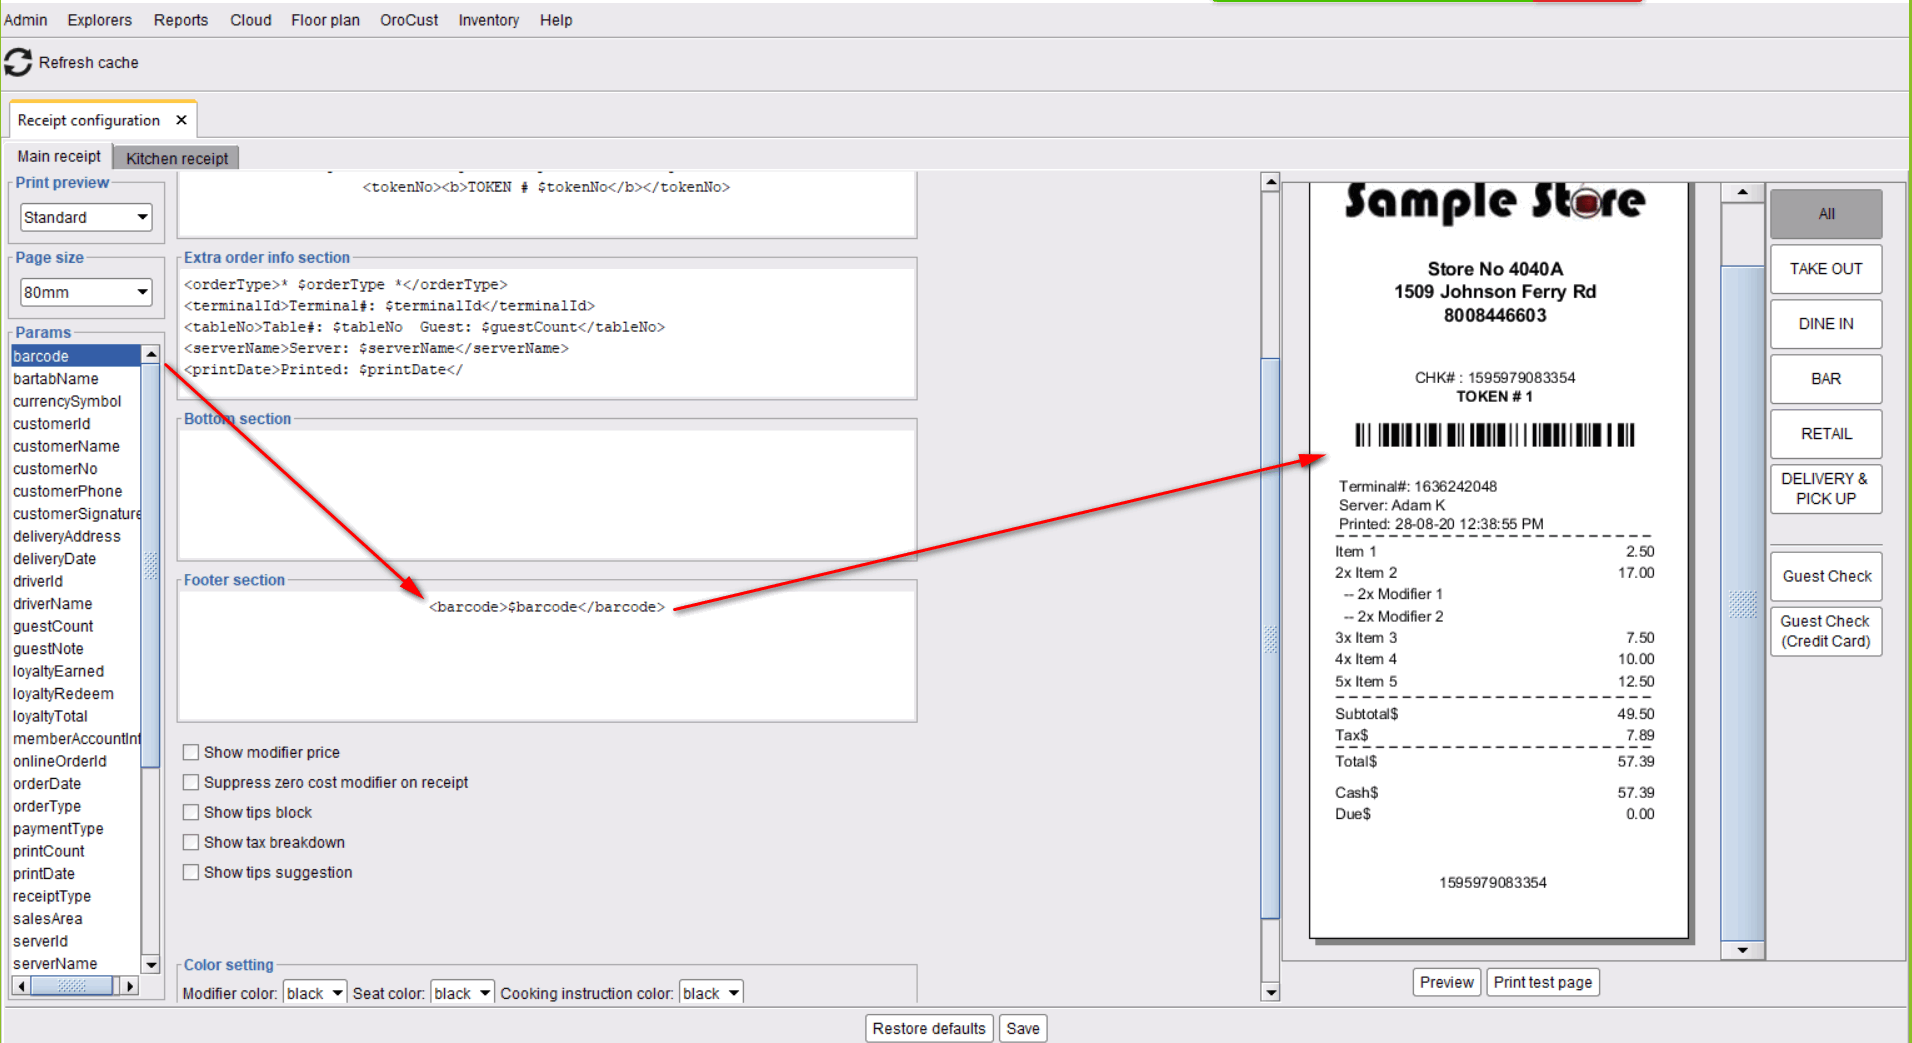
-
Oropos
-
POS installation
-
Back office
- Store configuration
- Configuring Receipt for Different Paper sizes
- Sending Transaction Receipts Via Email
- Hiding server summary button in user view
- Showing tickets on right side in the order view
- Hide MISC button in order
- Setting Up Multi-Currency System
- Setting up master terminal
- Terminal wise Order Type
- Visual Receipt Design
- Database setup for Multiple Terminals
- Store sessions, opening and closing store
- Translate UI in OROPOS
-
Menu Programming
- ORO POS : Adding Modifier for a simple item
- ORO POS : Adding a Simple item
- Menu page designer
- Combo Items
- Applying Modifier Group of a Menu Item to Other Menu Items
- Selling Lotteries and Paying Out Winning Tickets
- Showing details of menu items while adding to customers order
- Adding Pizza in ORO POS
- Modifier price rules
- Price List
- Making drinks/beverage mandatory in an order type
- Different types of Units in ORO POS
- Menu Group vs Category
- Taxing To-Go Food
- Setting up meal courses.
- Product and Items in ORO POS
- How to setup your Menu
- Importing Items from Spreadsheet
-
Hardware
- Minimum Requirements
- Adding sticker printer in ORO POS
- PAX S300 Configuration
- Configuring Cash Drawer
- Configuring Receipt Printer
- Configuring Kitchen Printer
- Printing barcode labels for products
- Configuring IDTECH SECURED MSR payment device
- How to setup Caller ID device in Cust Plugin
- Kitchen Display (KDS) Configuration
- Customer Monitor
- Kitchen Item Sticker
- Recommended Hardware
-
Payroll Management
-
Employee Management
-
Order Types
-
Gift Card & Loyalty
-
Migration
-
Inventory
- Inventory Transaction Report
- Inventory On Hand Report
- Re Order Level & Shopping List
- Inventory Configuration
- Inventory Location Set Up
- Inventory Stock Count
- Inventory: adding a new Vendor
- Inventory Purchase order
- Inventory Stock Conversion
- Inventory Transfer
- Recipe / Bill of Materials ( BoM )
- Different types of Units in ORO POS
- Product and Items in ORO POS
-
Table Service
-
Payment
- Dejavoo Z6 , Z9 , Z11 Configuration
- iPP320 Configuration
- Dejavoo Z6 , Z9 , Z11 Configuration
- Custom Payments in ORO POS
- Ticket Splitting in ORO POS
- Paid, Closed and Open Ticket status
- Coupons, Discounts & Reprice
- Void & Refund in ORO POS
- Configuring Service Charge
- Payment from customer balance
- Sending Transaction Receipts Via Email
- Pre-authorize & Tips Processing
- Capture Credit Card Transactions
- PAX S300 Configuration
- Understanding Tips Payout
- Penny Rounding For Canada
- Adding default service charge
- Configuring IDTECH SECURED MSR payment device
- Setting Up Multi-Currency System
- Tax Settings
- Send vs Hold vs Done
- Visual Receipt Design
-
Reporting
- Payroll Report
- Emailing Daily Sales Report
- Void Item Report
- Sales Report (Non-Inventory Items)
- Sales Report (Inventory Items)
- Session summary report
- End of day summary report
- Tax-exempt report
- Understanding Sales Balance Report
- Understanding Token Number
- Understanding Gross Receivable, Receipt Differential and Tips Differential
-
Customer Management
-
Retail
-
In this page