
📺 Kitchen Display System (KDS) Configuration
A Kitchen Display System (KDS) replaces paper kitchen chits with a touchscreen monitor. Orders appear on screen as soon as the server hits “Send” — chefs see them live, mark them done, and pass them to dispatch. No paper waste, no lost tickets, faster service.
Order rings up at the cashier → instantly appears on a kitchen screen. Chef cooks → “bumps” the order → dispatch monitor shows it’s ready. Server grabs food and runs.

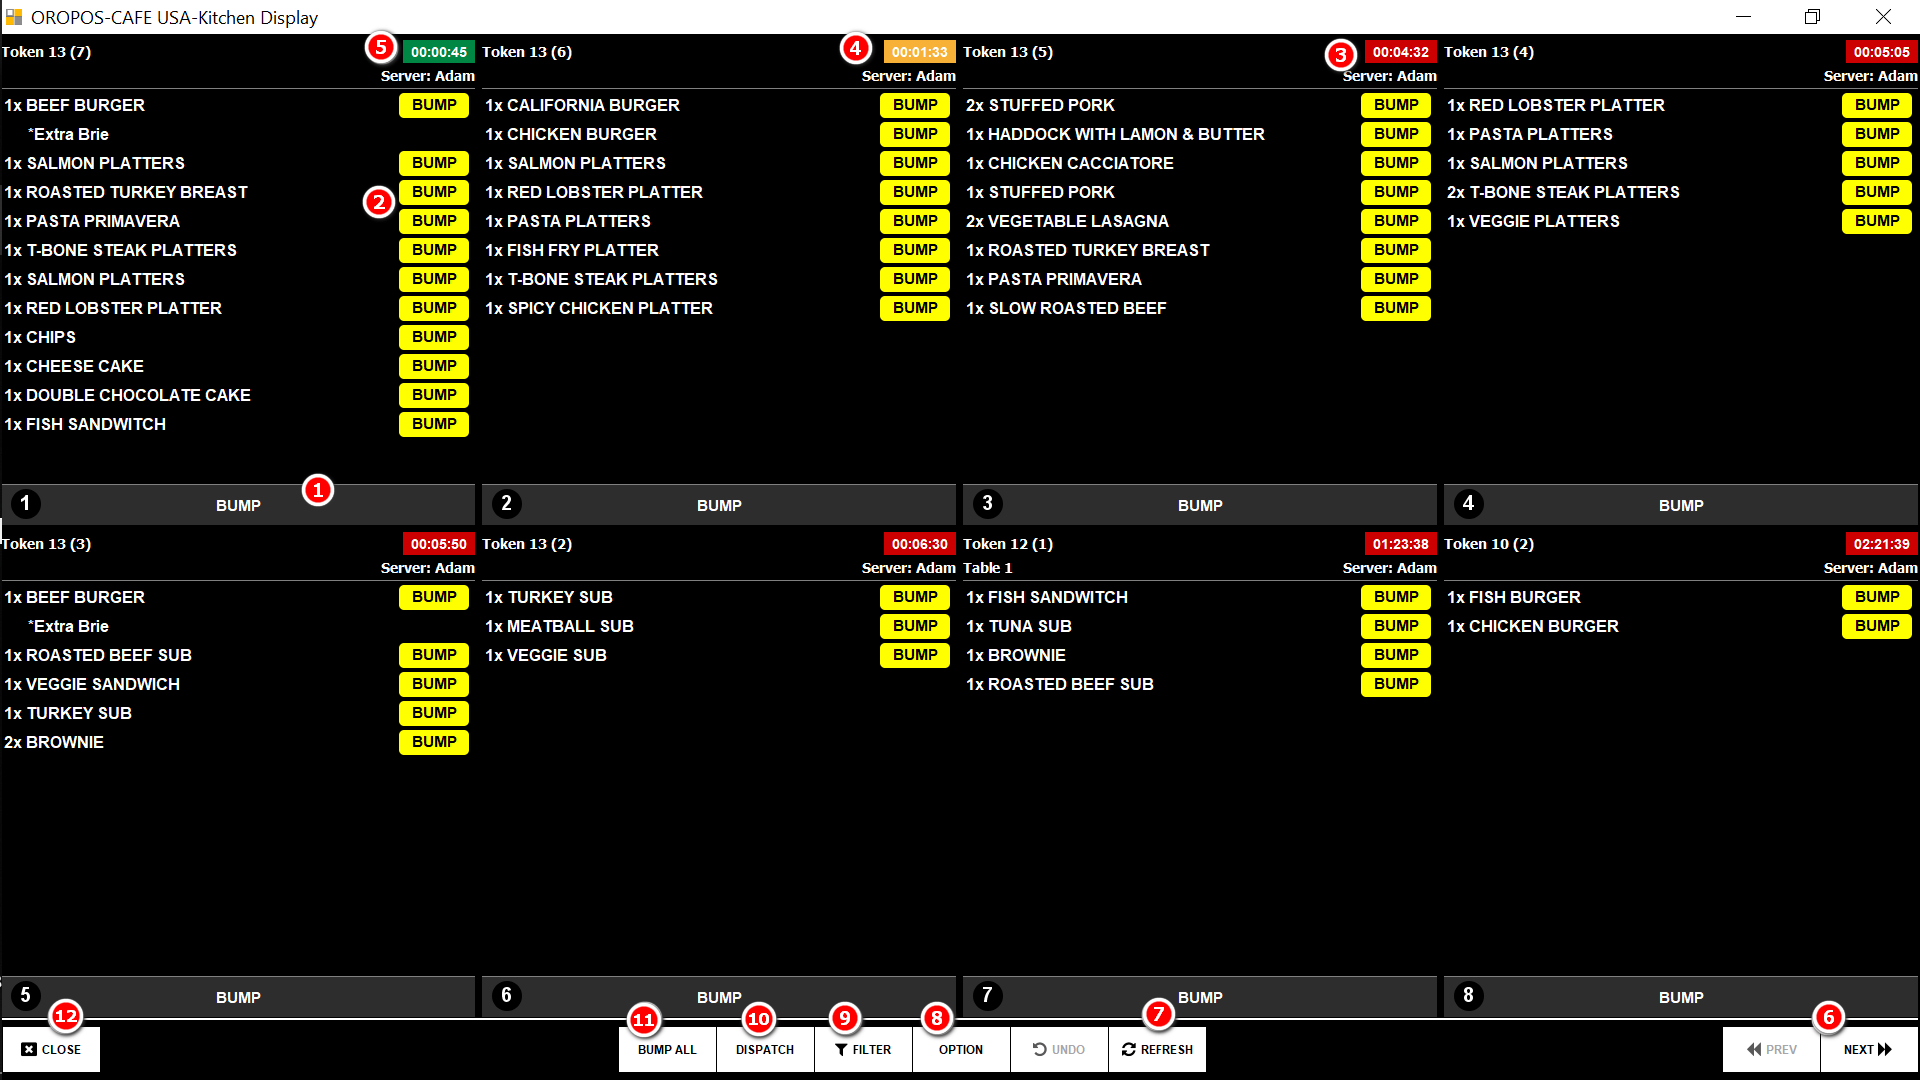
⚙️ How KDS Works (Step by Step)
| Step | What Happens | Who’s Acting |
|---|---|---|
| 1 | Server takes order, hits Send | 🧑💼 Server |
| 2 | Order appears on KDS screen, refresh button blinks | 📺 KDS |
| 3 | Chef loads the ticket, sees items + mods + table info | 👨🍳 Chef |
| 4 | Timer starts → ticket changes color as time elapses | 📺 KDS |
| 5 | Chef finishes cooking → presses Bump | 👨🍳 Chef |
| 6 | Bumped ticket moves to Dispatch monitor as “Ready” | 📺 Dispatch KDS |
| 7 | Server sees “ready”, picks up food, presses Dispatch | 🧑💼 Server |
| 8 | Ticket marked “Done” — flow complete | ✅ System |
“Bumping” means the chef marks the ticket complete. Most kitchens bump the entire ticket at once. Some stores allow chefs to bump each item separately (useful when one entrée takes 20 min and another takes 5).
🎯 Why Use KDS Instead of Paper Chits?
| Benefit | Why It Matters |
|---|---|
| 📄 No paper waste | Saves money, no jammed printers during rush |
| ⏱️ Real-time timers | Chef sees how long each ticket has been in queue |
| 🎨 Color-coded urgency | Old tickets turn red — visible at a glance |
| 📊 Track prep speed | Reports show avg time per ticket / per chef |
| 🚀 No lost tickets | Digital — no paper falls behind the grill |
| 🔄 Easier to recall orders | Refresh and see all open tickets |
🖥️ Hardware Options
| Option | Setup | Best For |
|---|---|---|
| 🖥️ Dedicated touchscreen | Standalone monitor mounted in kitchen | Restaurants with separate kitchen |
| ⌨️ Regular terminal + bump bar | USB bump bar acts as keyboard | Chefs with messy hands (no touch needed) |
Based on monitor size, KDS shows 4-8 kitchen tickets at a time. Bigger screens = more visible orders.
🎬 Full Workflow Walkthrough
KDS Time Out & Workflow
📌 Real Example: Lunch Rush at “Joe’s Diner”
| Time | Event |
|---|---|
| 12:15:00 | Sarah orders Burger + Fries → server hits Send |
| 12:15:05 | Ticket appears on grill KDS, timer starts (green) |
| 12:18:00 | Timer turns yellow (3 min in) |
| 12:21:30 | Chef finishes burger, presses Bump |
| 12:21:32 | Ticket appears on dispatch monitor as “Ready” |
| 12:21:45 | Server picks up, presses Dispatch |
| 12:22:00 | Sarah’s table has hot food. Total time: ~7 min. |
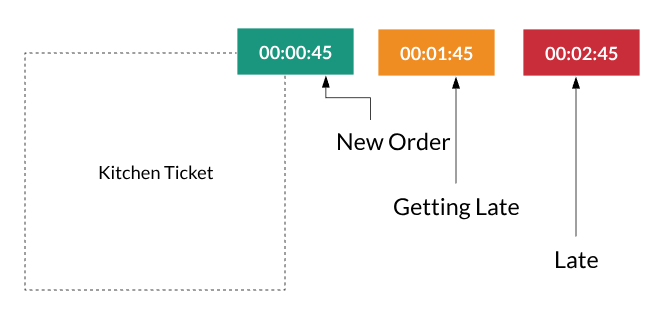
🎨 Ticket Timer Colors
Each ticket has a timer at the top. Color changes based on elapsed time (configurable):
| Color | Meaning | Default Range |
|---|---|---|
| 🟢 Green | Just received, on track | 0-3 min |
| 🟡 Yellow | Getting urgent | 3-7 min |
| 🔴 Red | Overdue! Customer is waiting | 7+ min |
📤 Dispatch View — Where Servers Pick Up
The Dispatch monitor shows orders that are ready to serve. Servers walk by, see what’s ready, grab it, hit dispatch. Done.
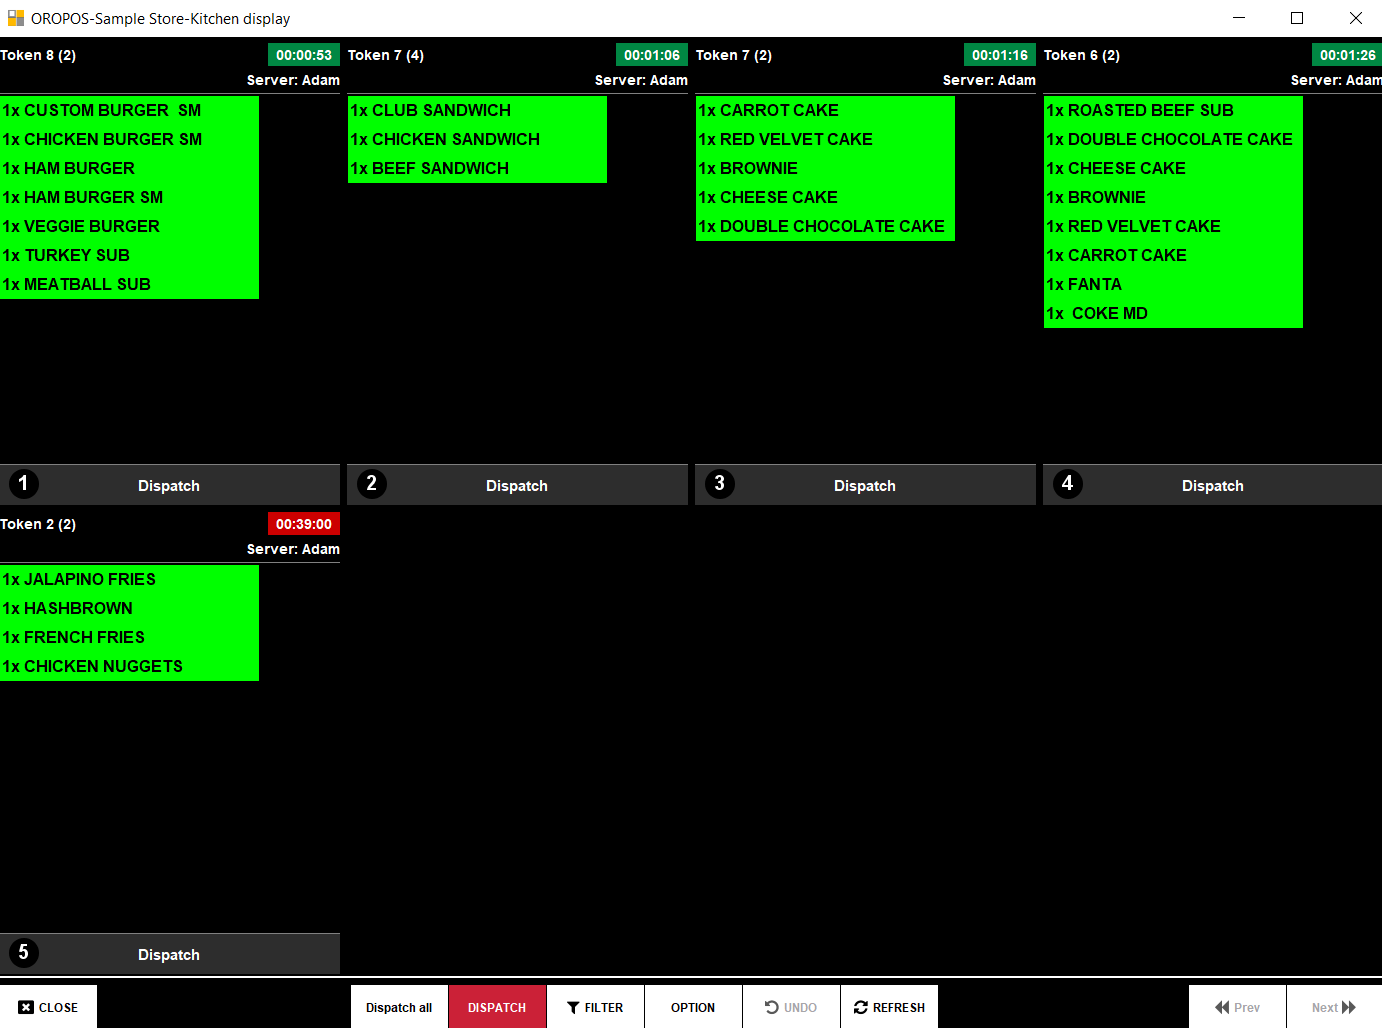
Dispatch View — orders ready to serve
📱 KDS Dispatch View for Pickup & Drive-Thru
The Dispatch View is incredibly useful for Pickup orders and Drive-Thru windows — where customers (not servers) need to know when their order is ready.
🥡 Use Case 1: Customer-Facing Pickup Display
Mount a Dispatch screen at the pickup counter. Customers see their order # appear when it’s ready.
Example: Coffee Shop
- Customer orders #142 — Iced Latte
- Barista makes it → bumps from KDS
- Order #142 appears on customer-facing Dispatch screen
- Customer sees their number → walks up → grabs cup
- Cashier marks “Dispatched” on the back screen
Benefit: No more shouting “Sarah’s iced latte!”. Customers self-serve.
🚗 Use Case 2: Drive-Thru Order Tracking
Use the Dispatch View at the drive-thru window so the cashier knows exactly which order to hand out.
Example: Drive-Thru Burger Joint
| Step | Action |
|---|---|
| 1️⃣ Order taker | Takes order at speaker box → Order #156 |
| 2️⃣ Kitchen KDS | Cooks see #156, prepare burger + fries + drink |
| 3️⃣ Bump | Cook bumps → moves to Dispatch view |
| 4️⃣ Window cashier | Sees #156 ready on Dispatch screen |
| 5️⃣ Hand out | Customer pulls up → cashier hands #156 → presses Dispatch |
🍕 Use Case 3: Multi-Channel (Dine-In + Pickup + Delivery)
For restaurants that handle multiple order types simultaneously:
- 📺 Kitchen KDS — shows all orders by kitchen station
- 📺 Dispatch view (server-side) — for dine-in waitstaff
- 📺 Dispatch view (counter) — for pickup customers
- 📺 Dispatch view (delivery) — for drivers waiting to depart
Each station sees only the orders relevant to them — using the Filter by order type.
🛠️ How to Set Up Dispatch View
| Step | Action |
|---|---|
| 1 | Set up an additional touchscreen monitor at pickup/drive-thru |
| 2 | Log in → click Dispatch View button (or Extra Functionalities) |
| 3 | Apply Filter → choose Order Type (Take Out, Drive Thru, Delivery) |
| 4 | Customize text size + colors for visibility |
| 5 | Mount/position the screen so customers can see it |
⚙️ KDS Options
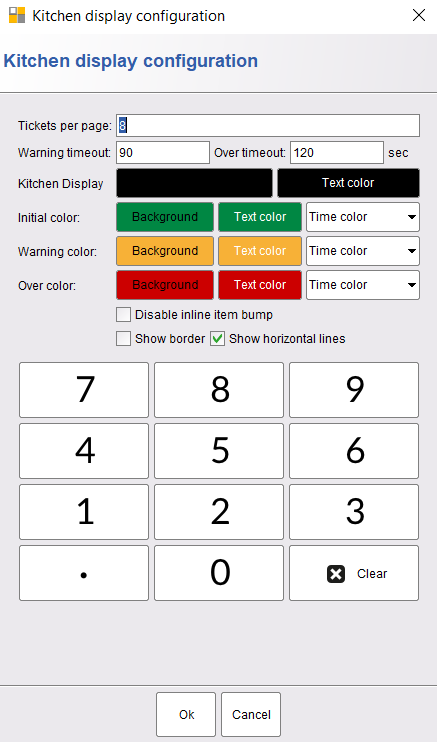
| Setting | What It Controls |
|---|---|
| 🎨 Display Style | Card/Grid layout |
| 🌈 Color | Background and accent colors |
| ⏱️ Timeouts | When tickets turn yellow / red |
| 📋 Tickets per page | How many tickets fit on screen at once |
🔍 Filter Tickets

Managers can filter tickets shown on a KDS by:
- 🖨️ Kitchen Printer — show only Grill, only Bar, etc.
- 🎫 Order Type — show only Dine In, only Take Out, etc.
The grill chef’s KDS shows only grill items. The pickup dispatch shows only Take Out orders. Each screen stays focused.
🟢 How to Enable KDS
Path: Back-Office → Admin → Terminal Configuration → Kitchen Display → Enable KDS
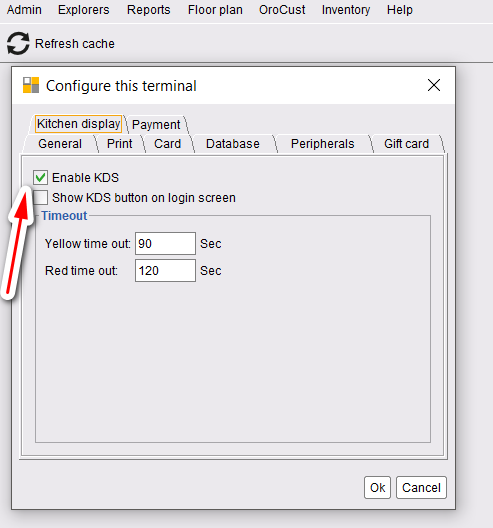
- Click the Enable KDS checkbox
- Press OK to save
- Restart the POS
Two Ways to Open KDS
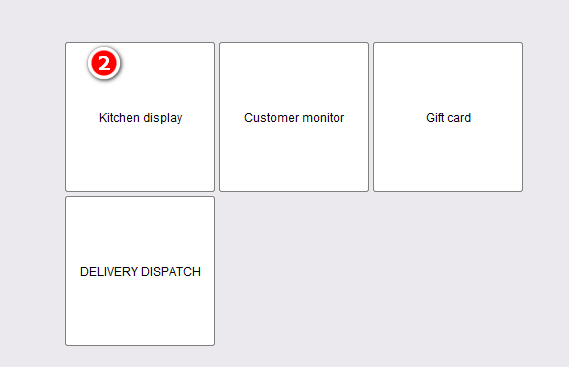
Option 1: From the Login Screen
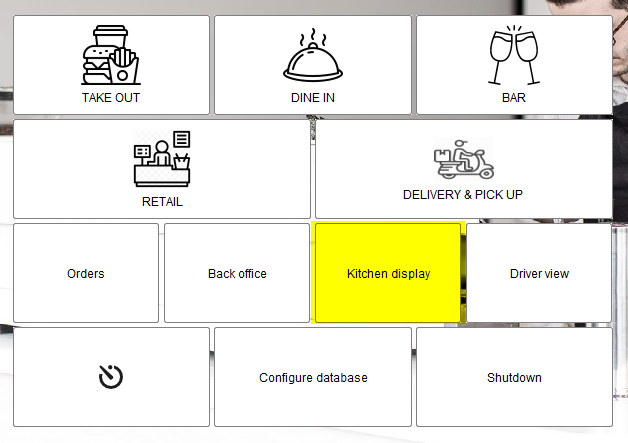
Option 2: From an Order Type Screen

⌨️ Bump Bar Configuration
Chefs have messy hands — flour, sauce, raw meat. Touching a screen is gross. A USB bump bar works like a keyboard: chef presses ticket # then “Bump” — done.
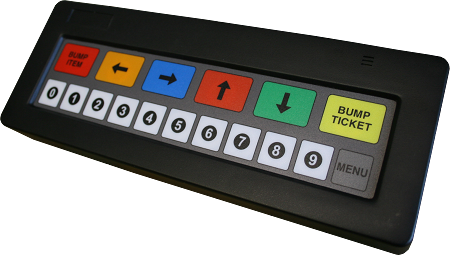
Bump bar acts as a USB keyboard:
- Press the ticket number on the bump bar
- Press Bump Ticket
- Done!
🆕 Updates in v1.5
1. Dispatch View Button in Extra Functionalities
Easier to launch dispatch view from anywhere.

2. Dispatch View Button on Login Screen

3. Customizable Text Sizes
| Setting | What It Controls |
|---|---|
| Item text size | Font size of menu items on the ticket |
| Ticket text size | Font size for ticket properties (Token #, Table #, etc.) |
⭐ Best Practices
| Tip | Why |
|---|---|
| Use filters per station | Grill chef sees only grill items, etc. |
| Use bump bar in messy kitchens | No greasy fingers on touchscreen |
| Set aggressive timeouts for fast-casual | Red alerts catch slow tickets fast |
| Use customer-facing dispatch at pickup | Customers self-serve when ready |
| Mount monitors at eye level + readable distance | Speed of read = speed of cook |
| Use a backup paper printer | In case of network/screen failure |
📚 Related Guides
| → Kitchen Printer | → Kitchen Stickers | → Customer Monitor |
📞 Need More Help?
Visit guide.orocube.com or contact helpdesk@orocube.net